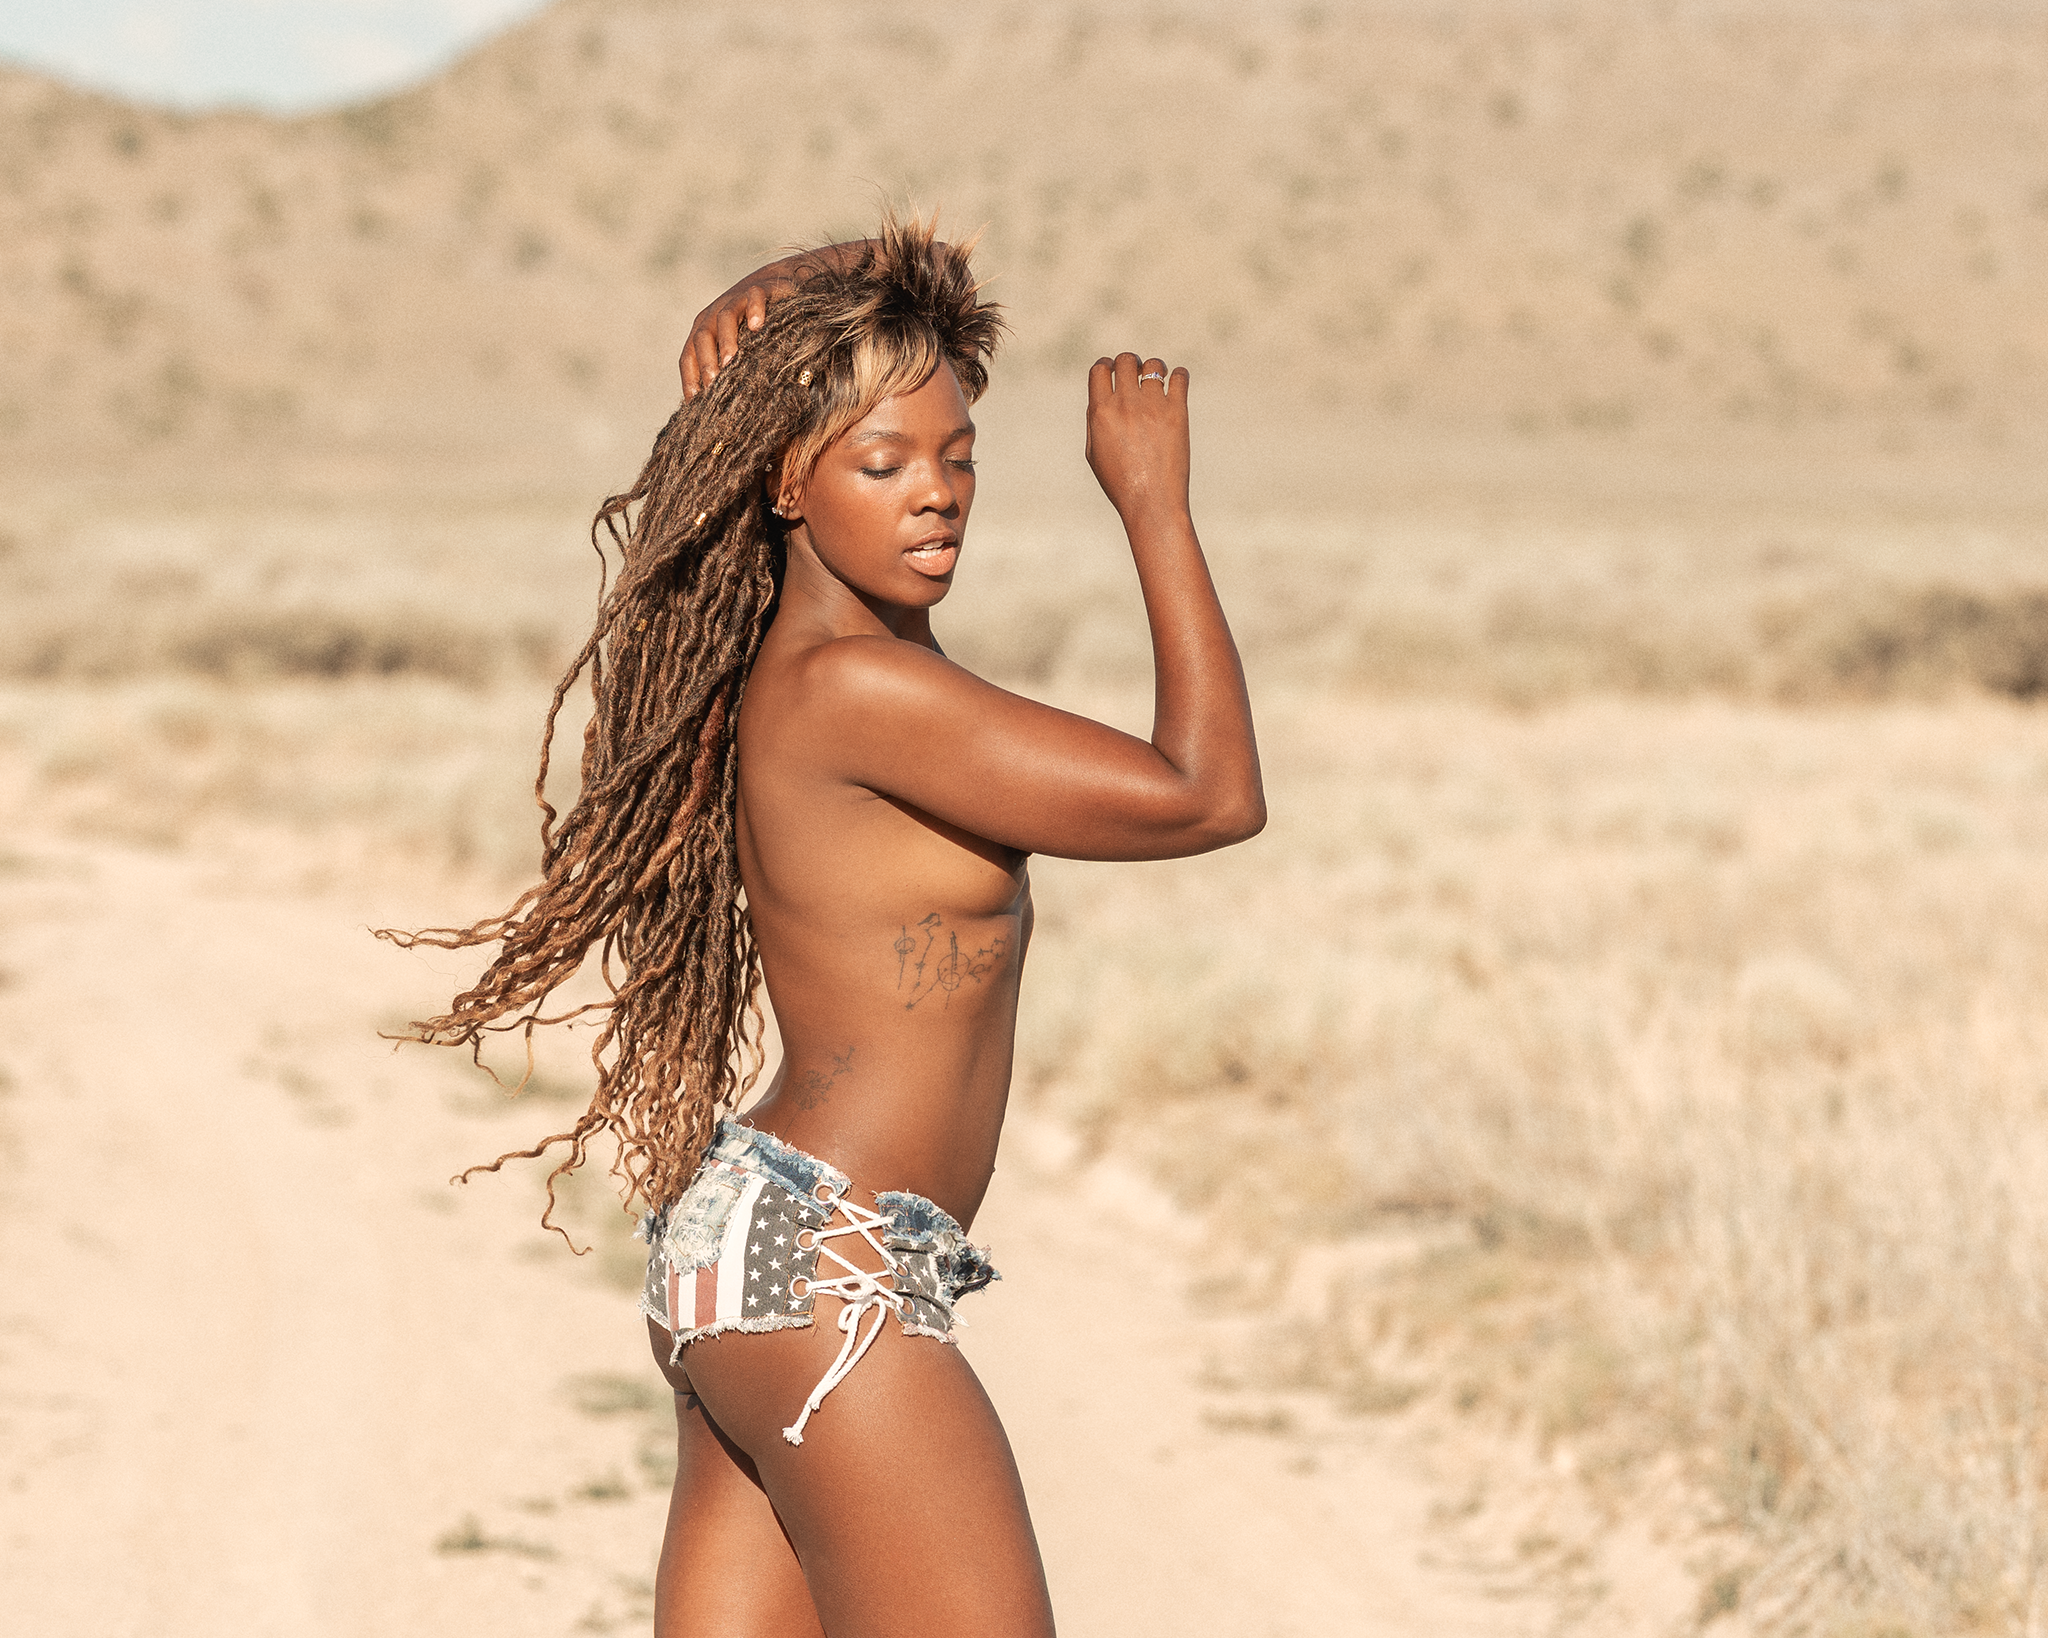
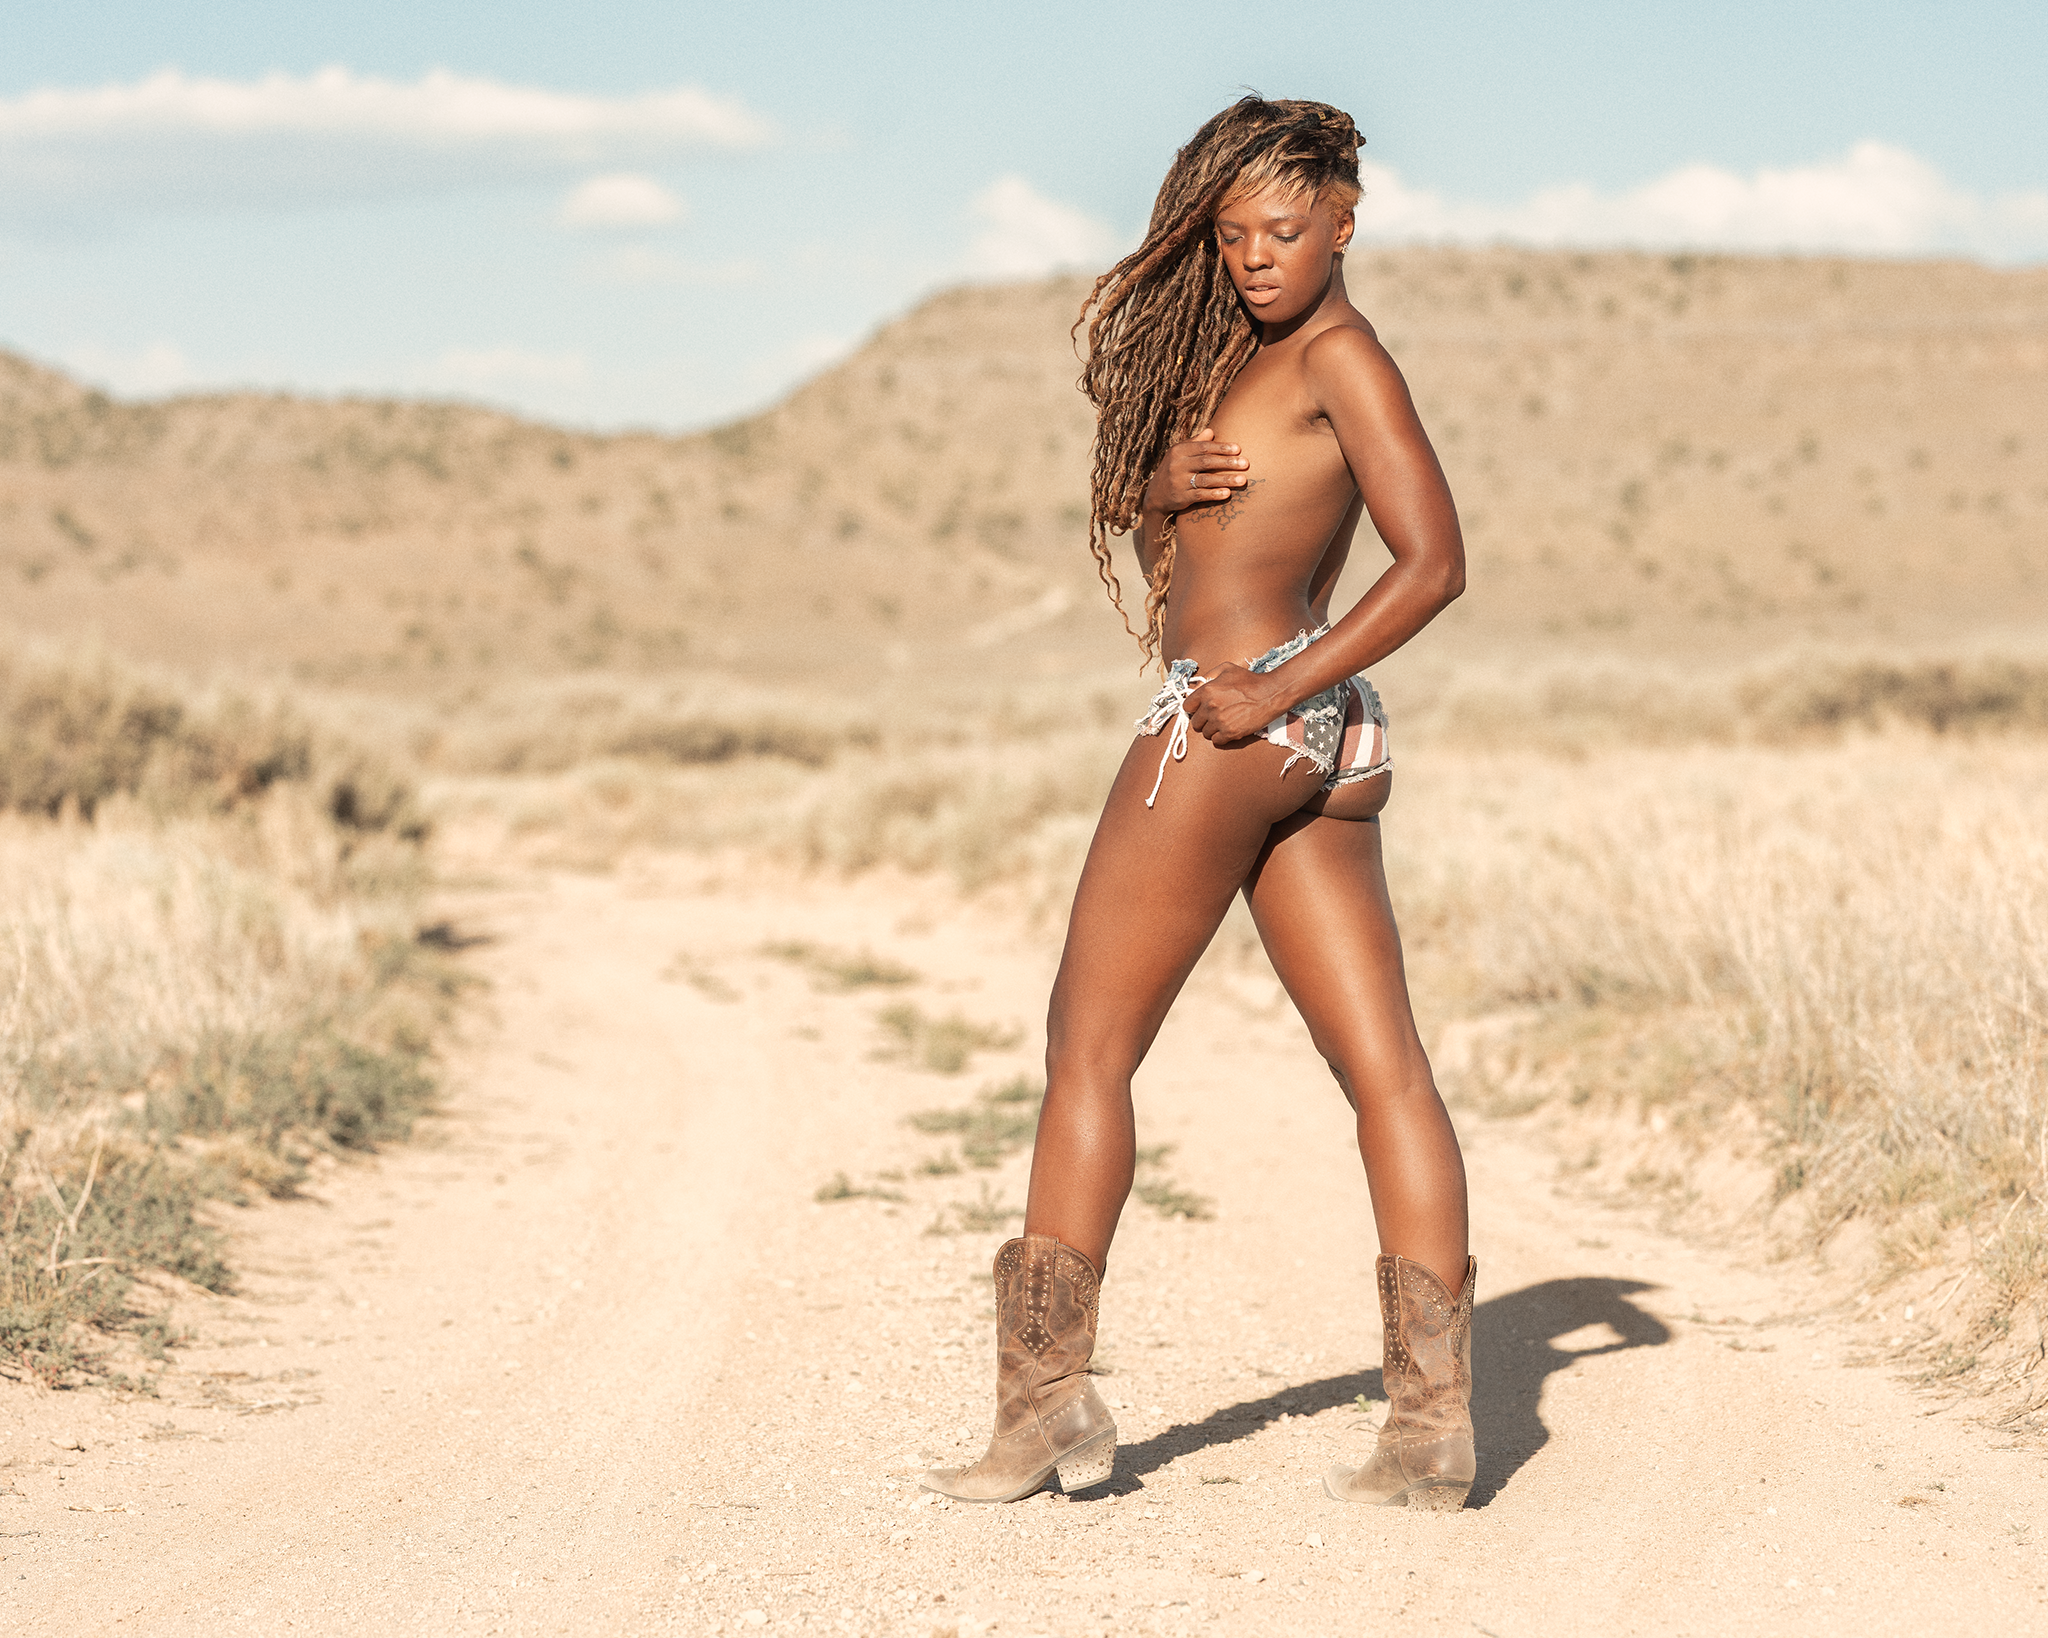
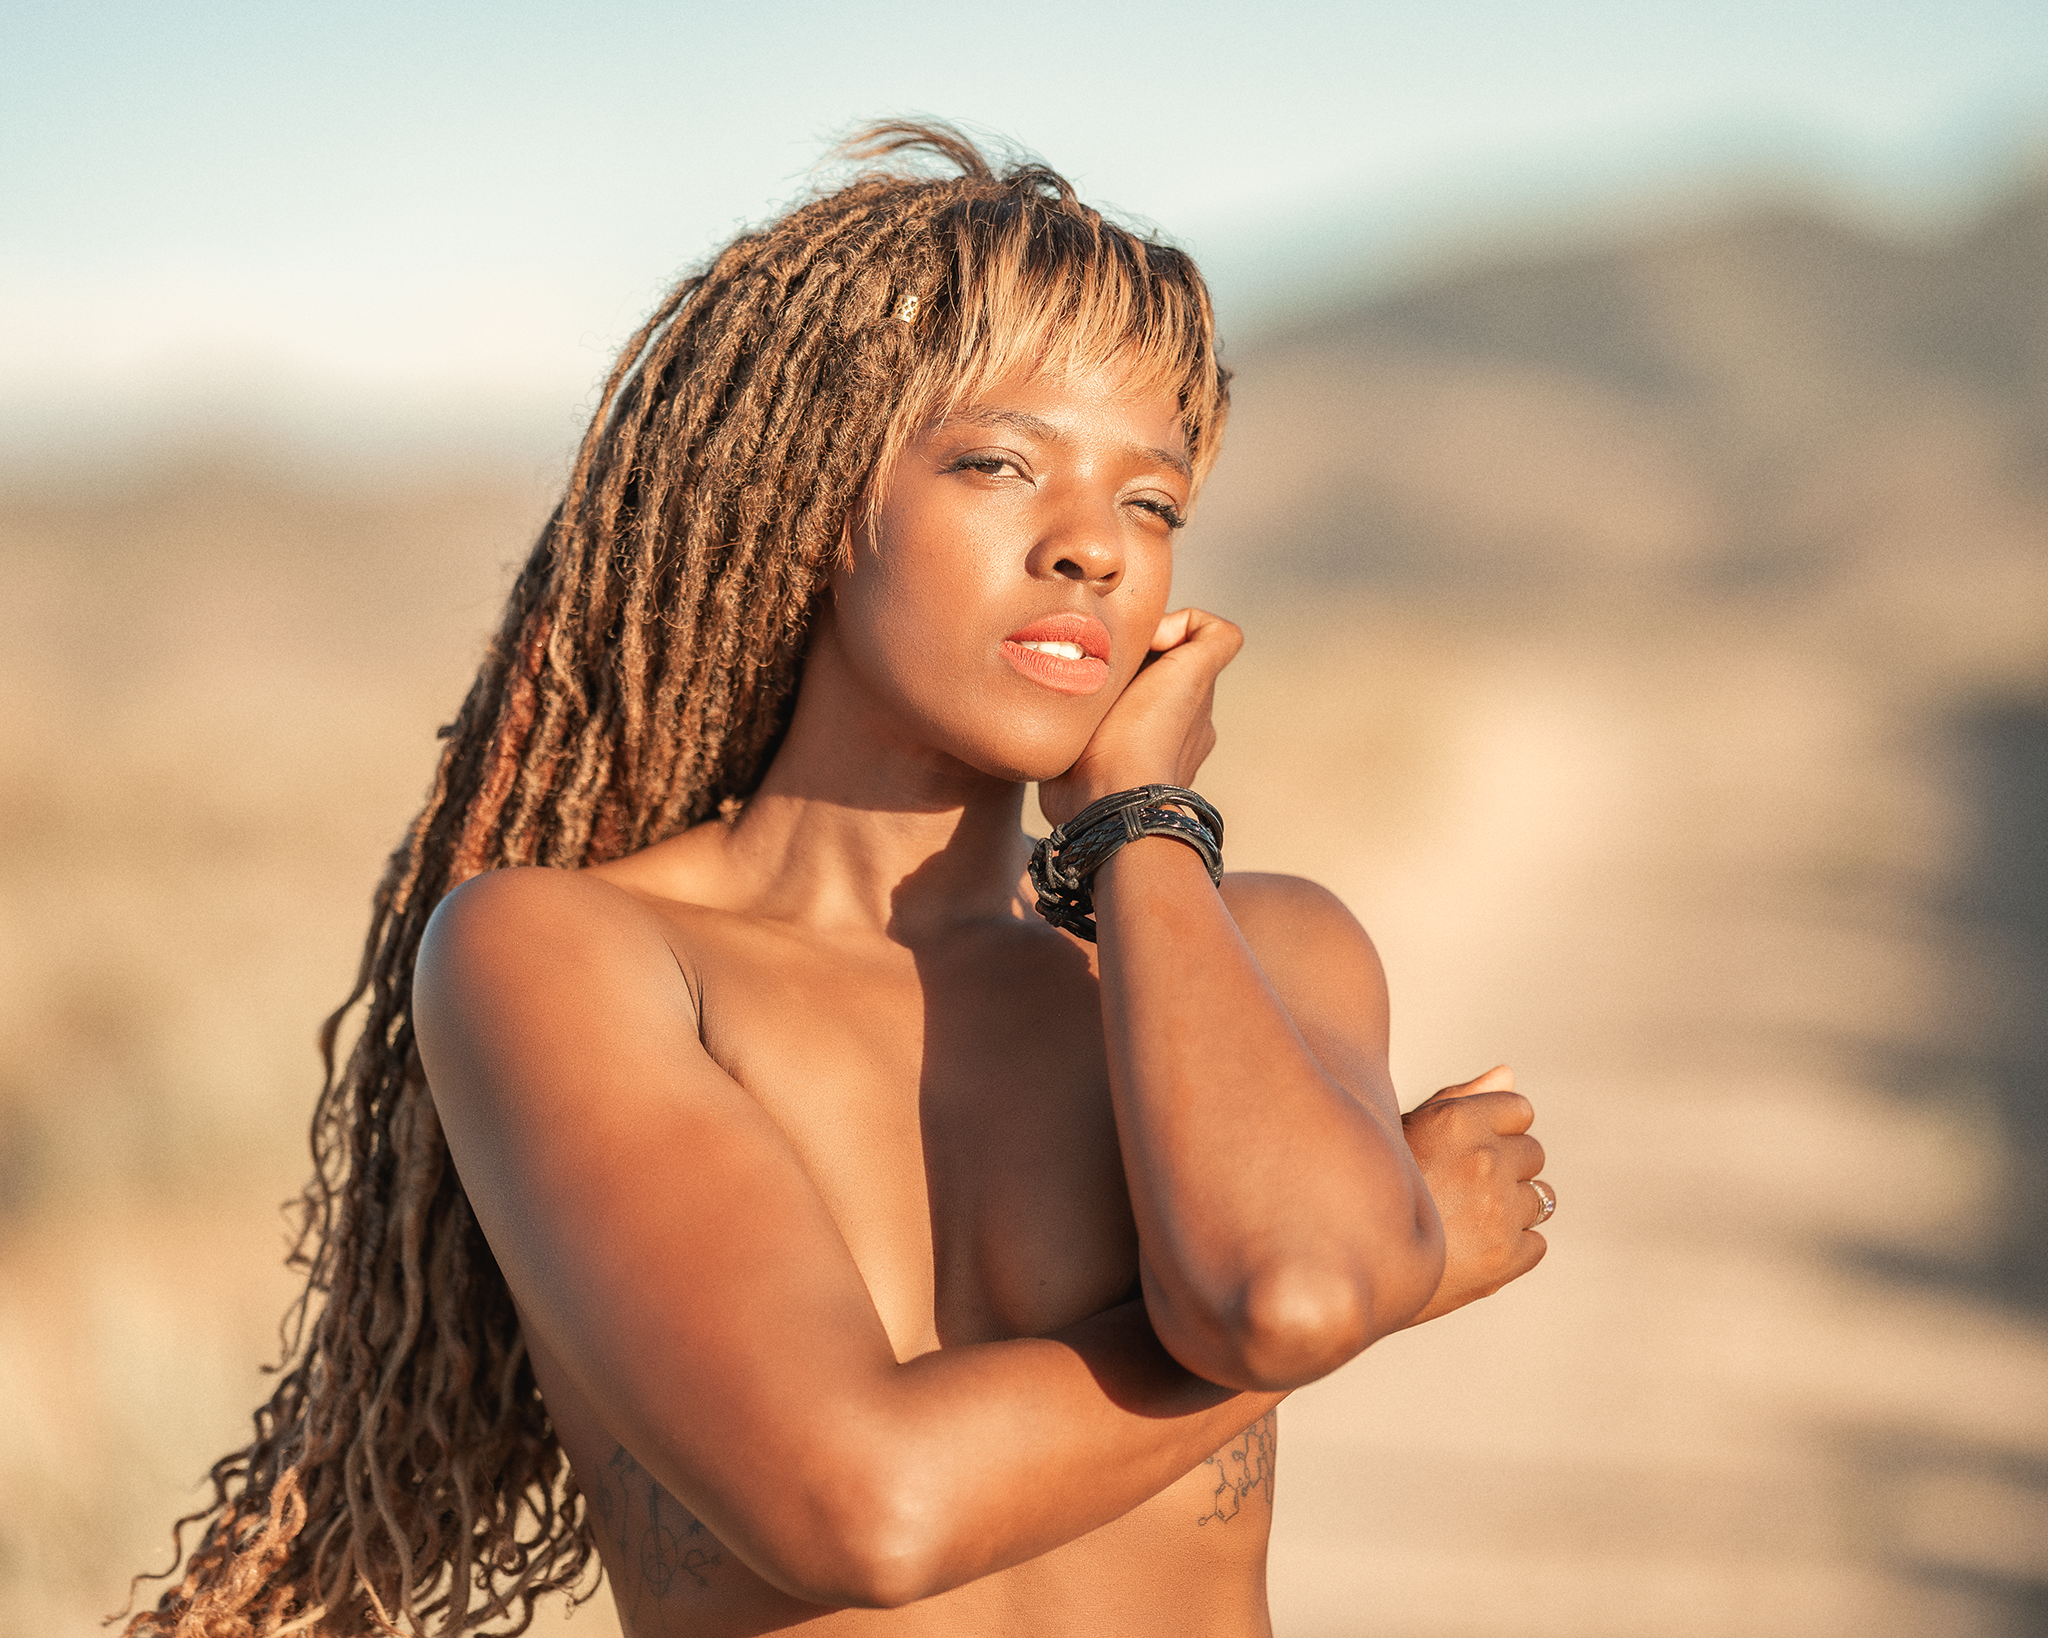
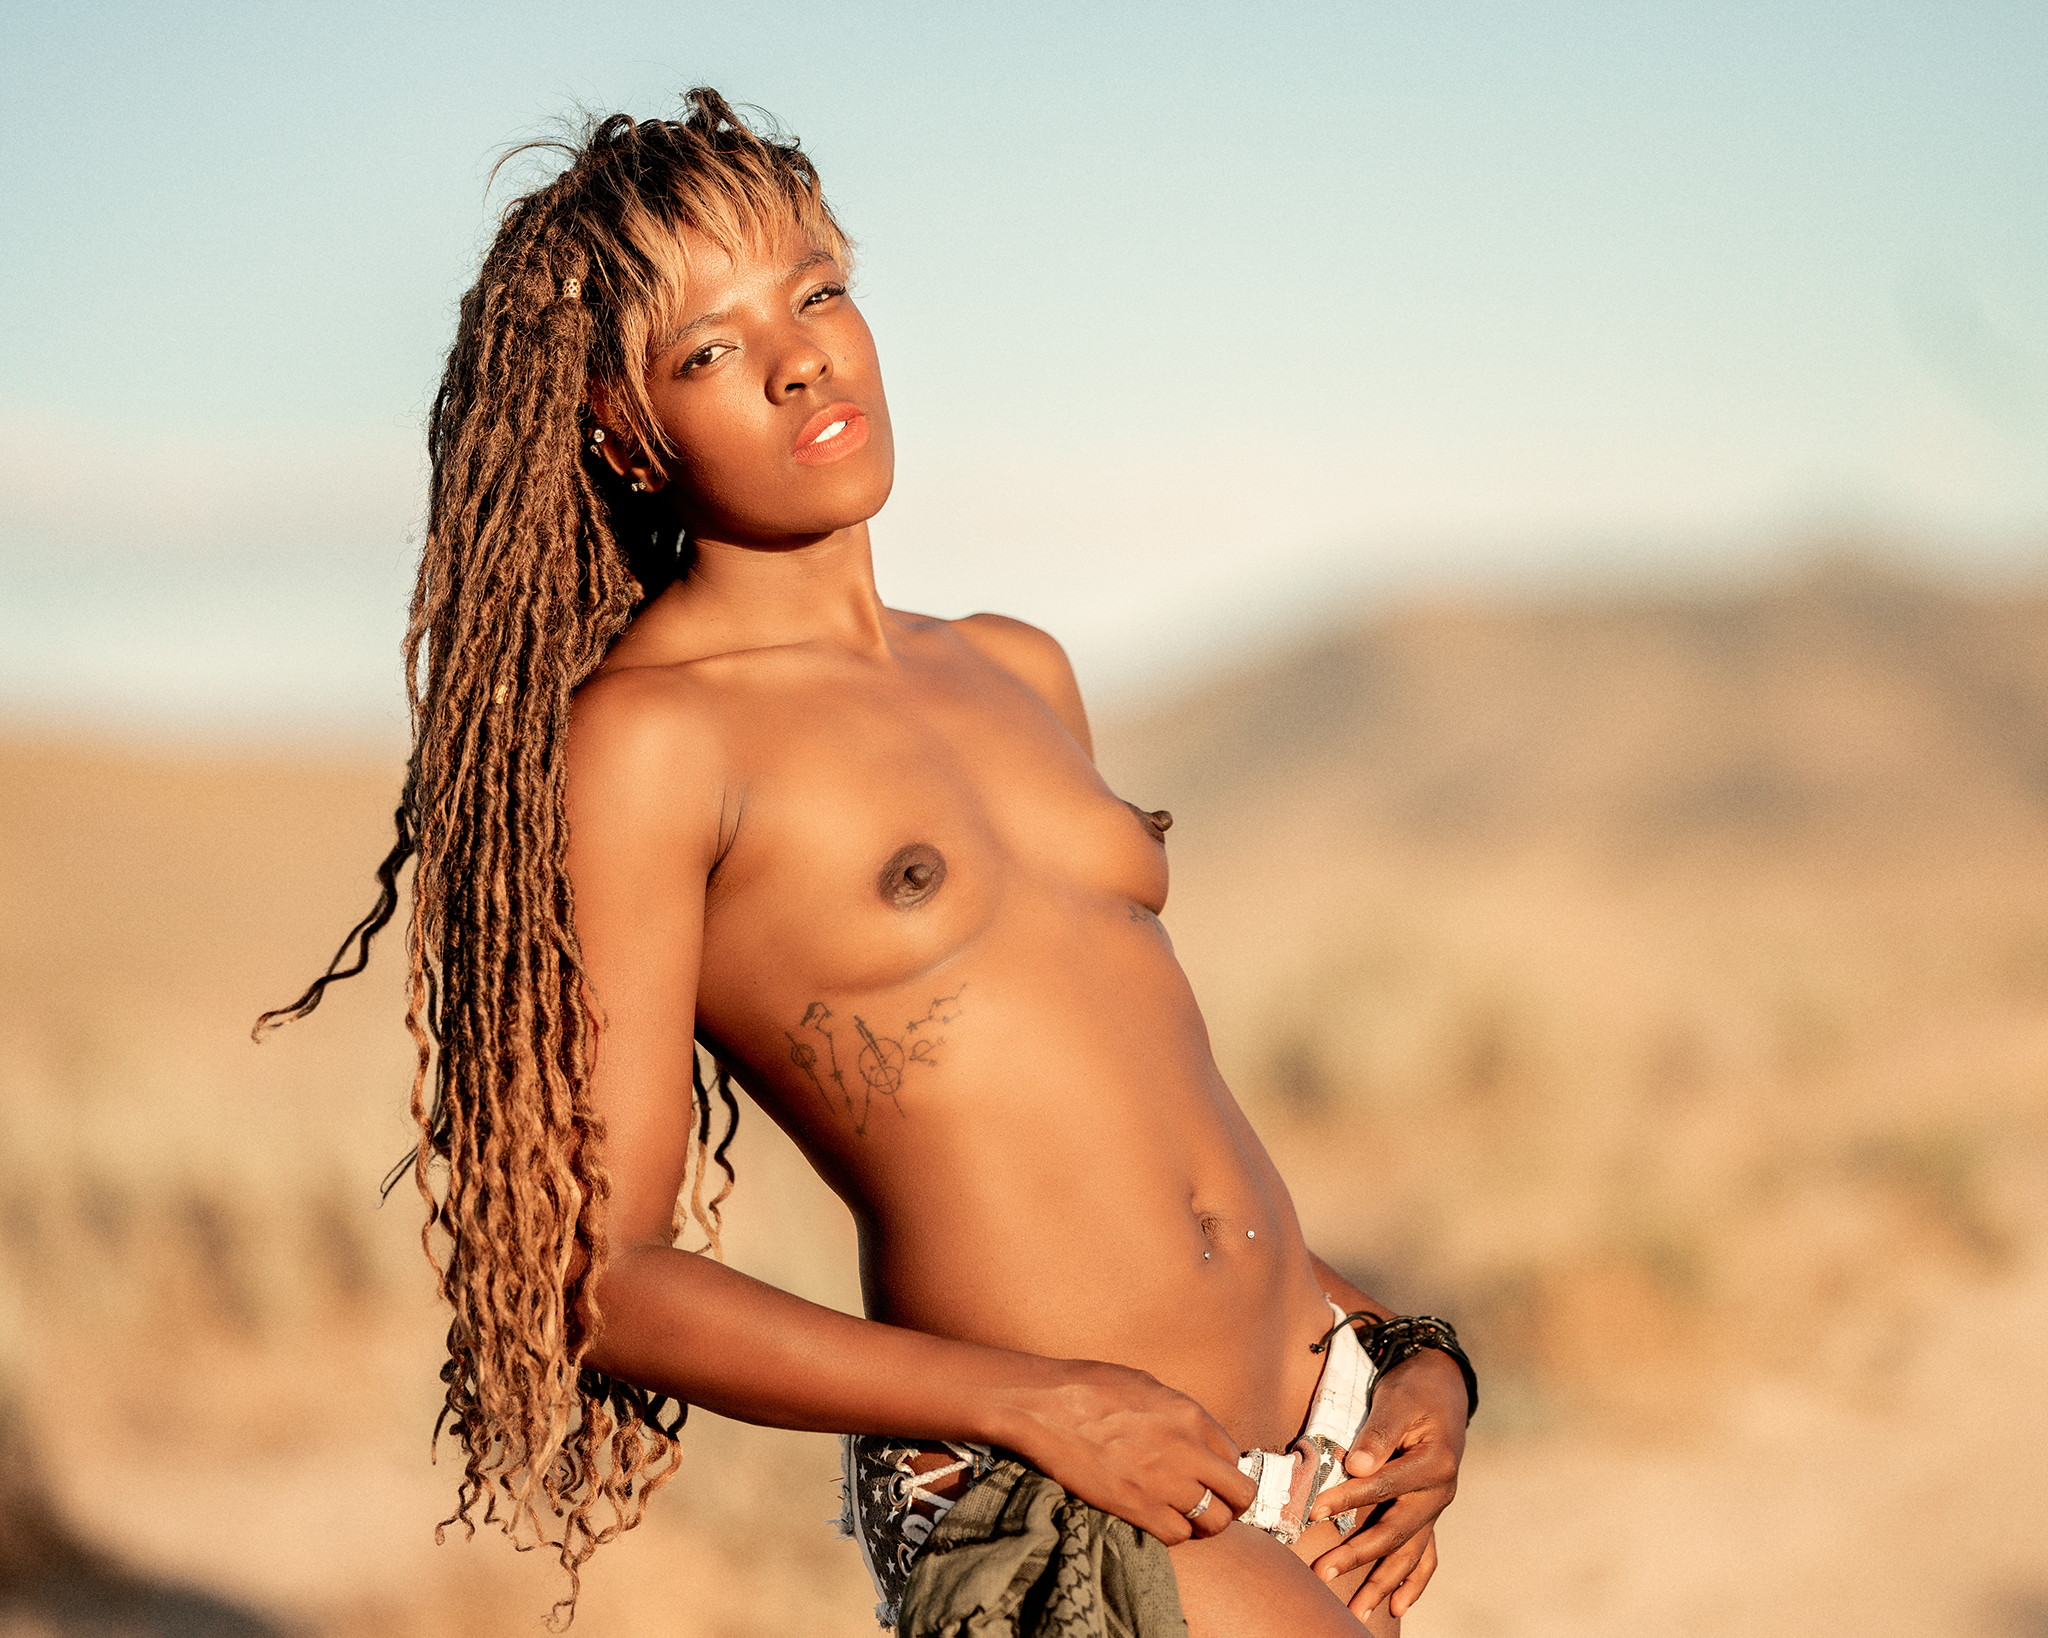
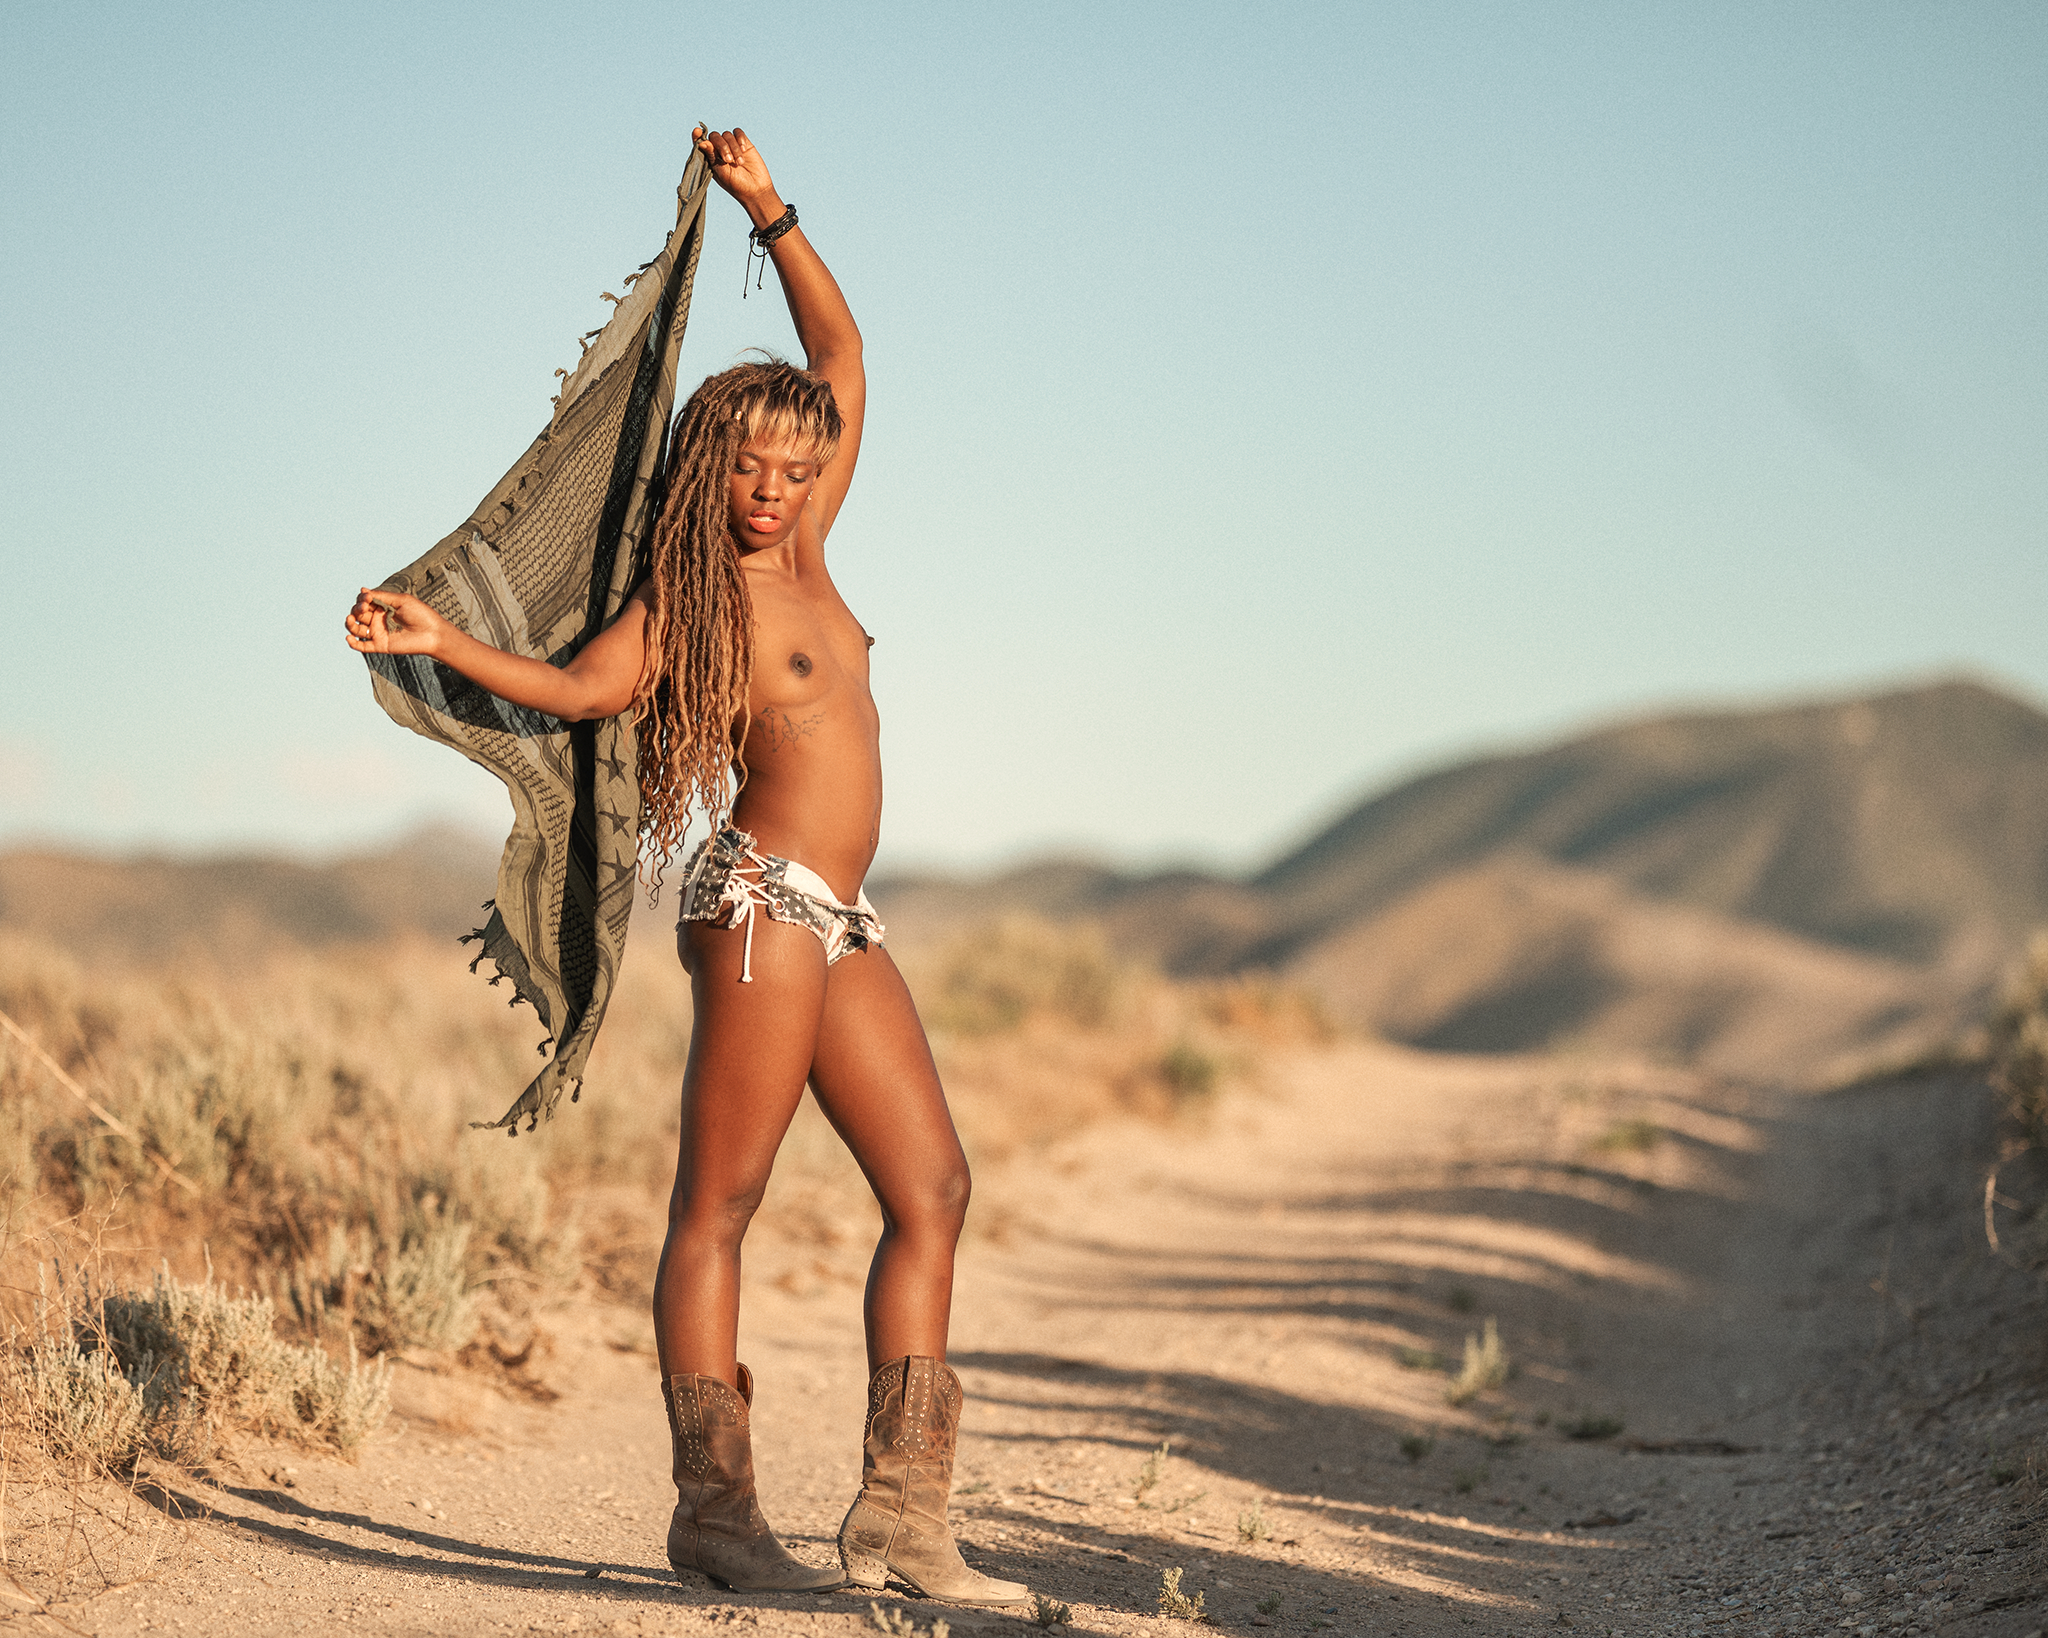
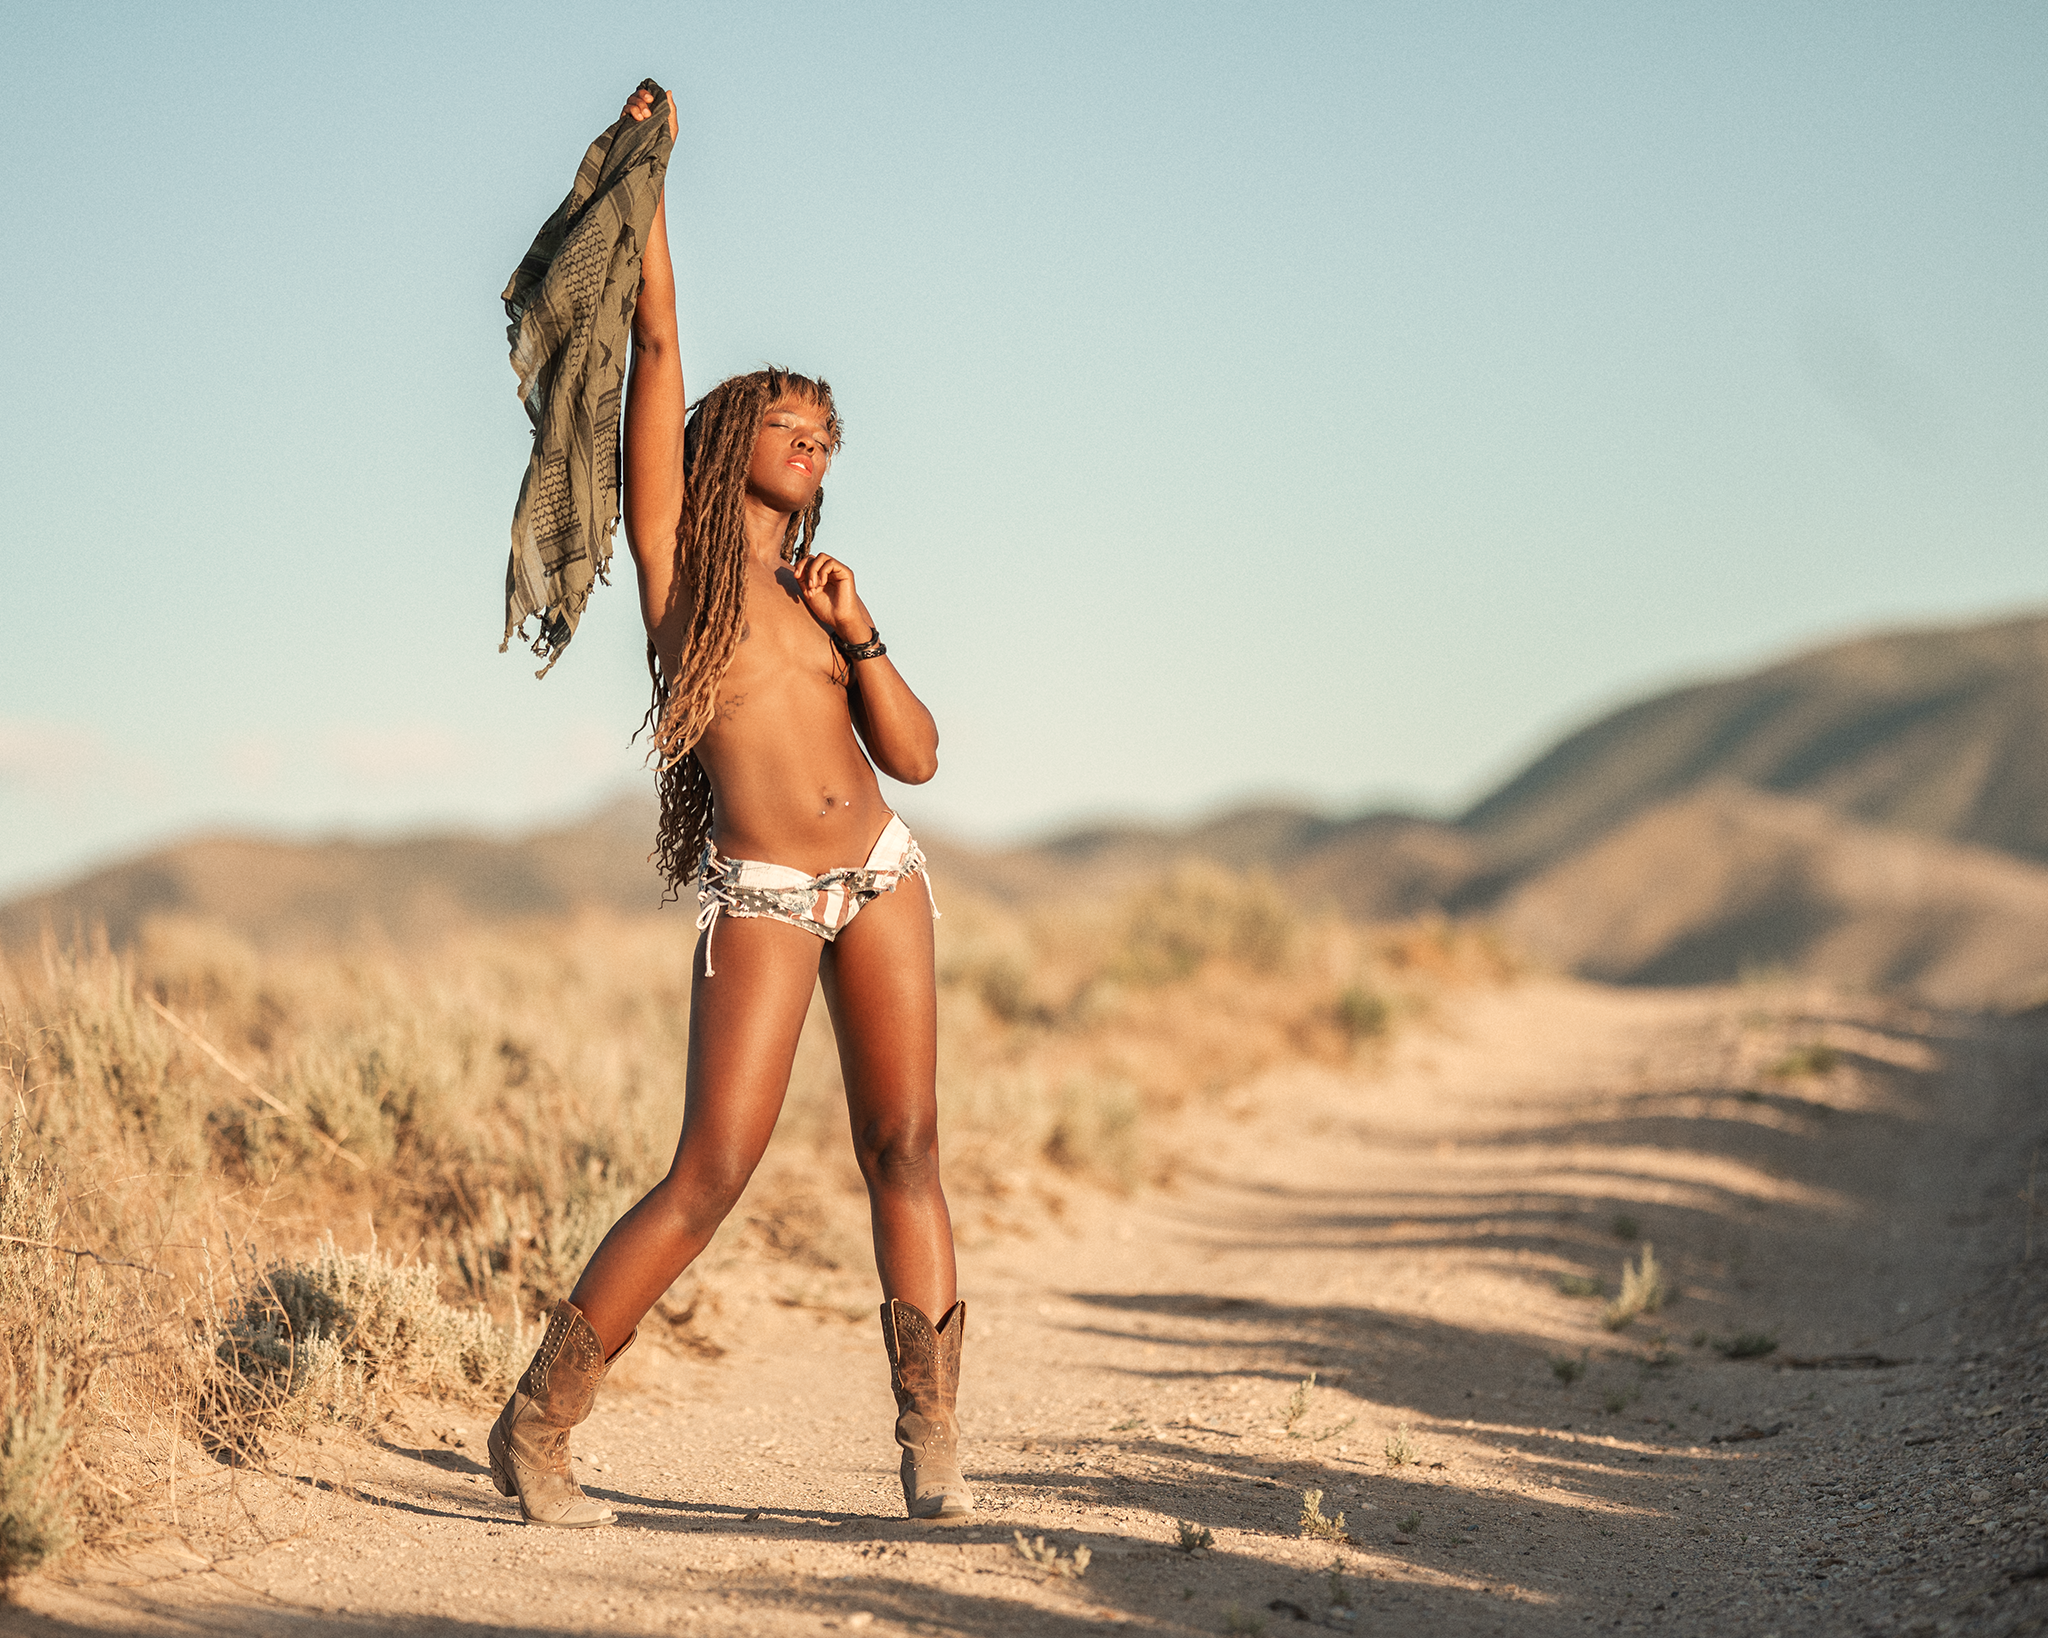
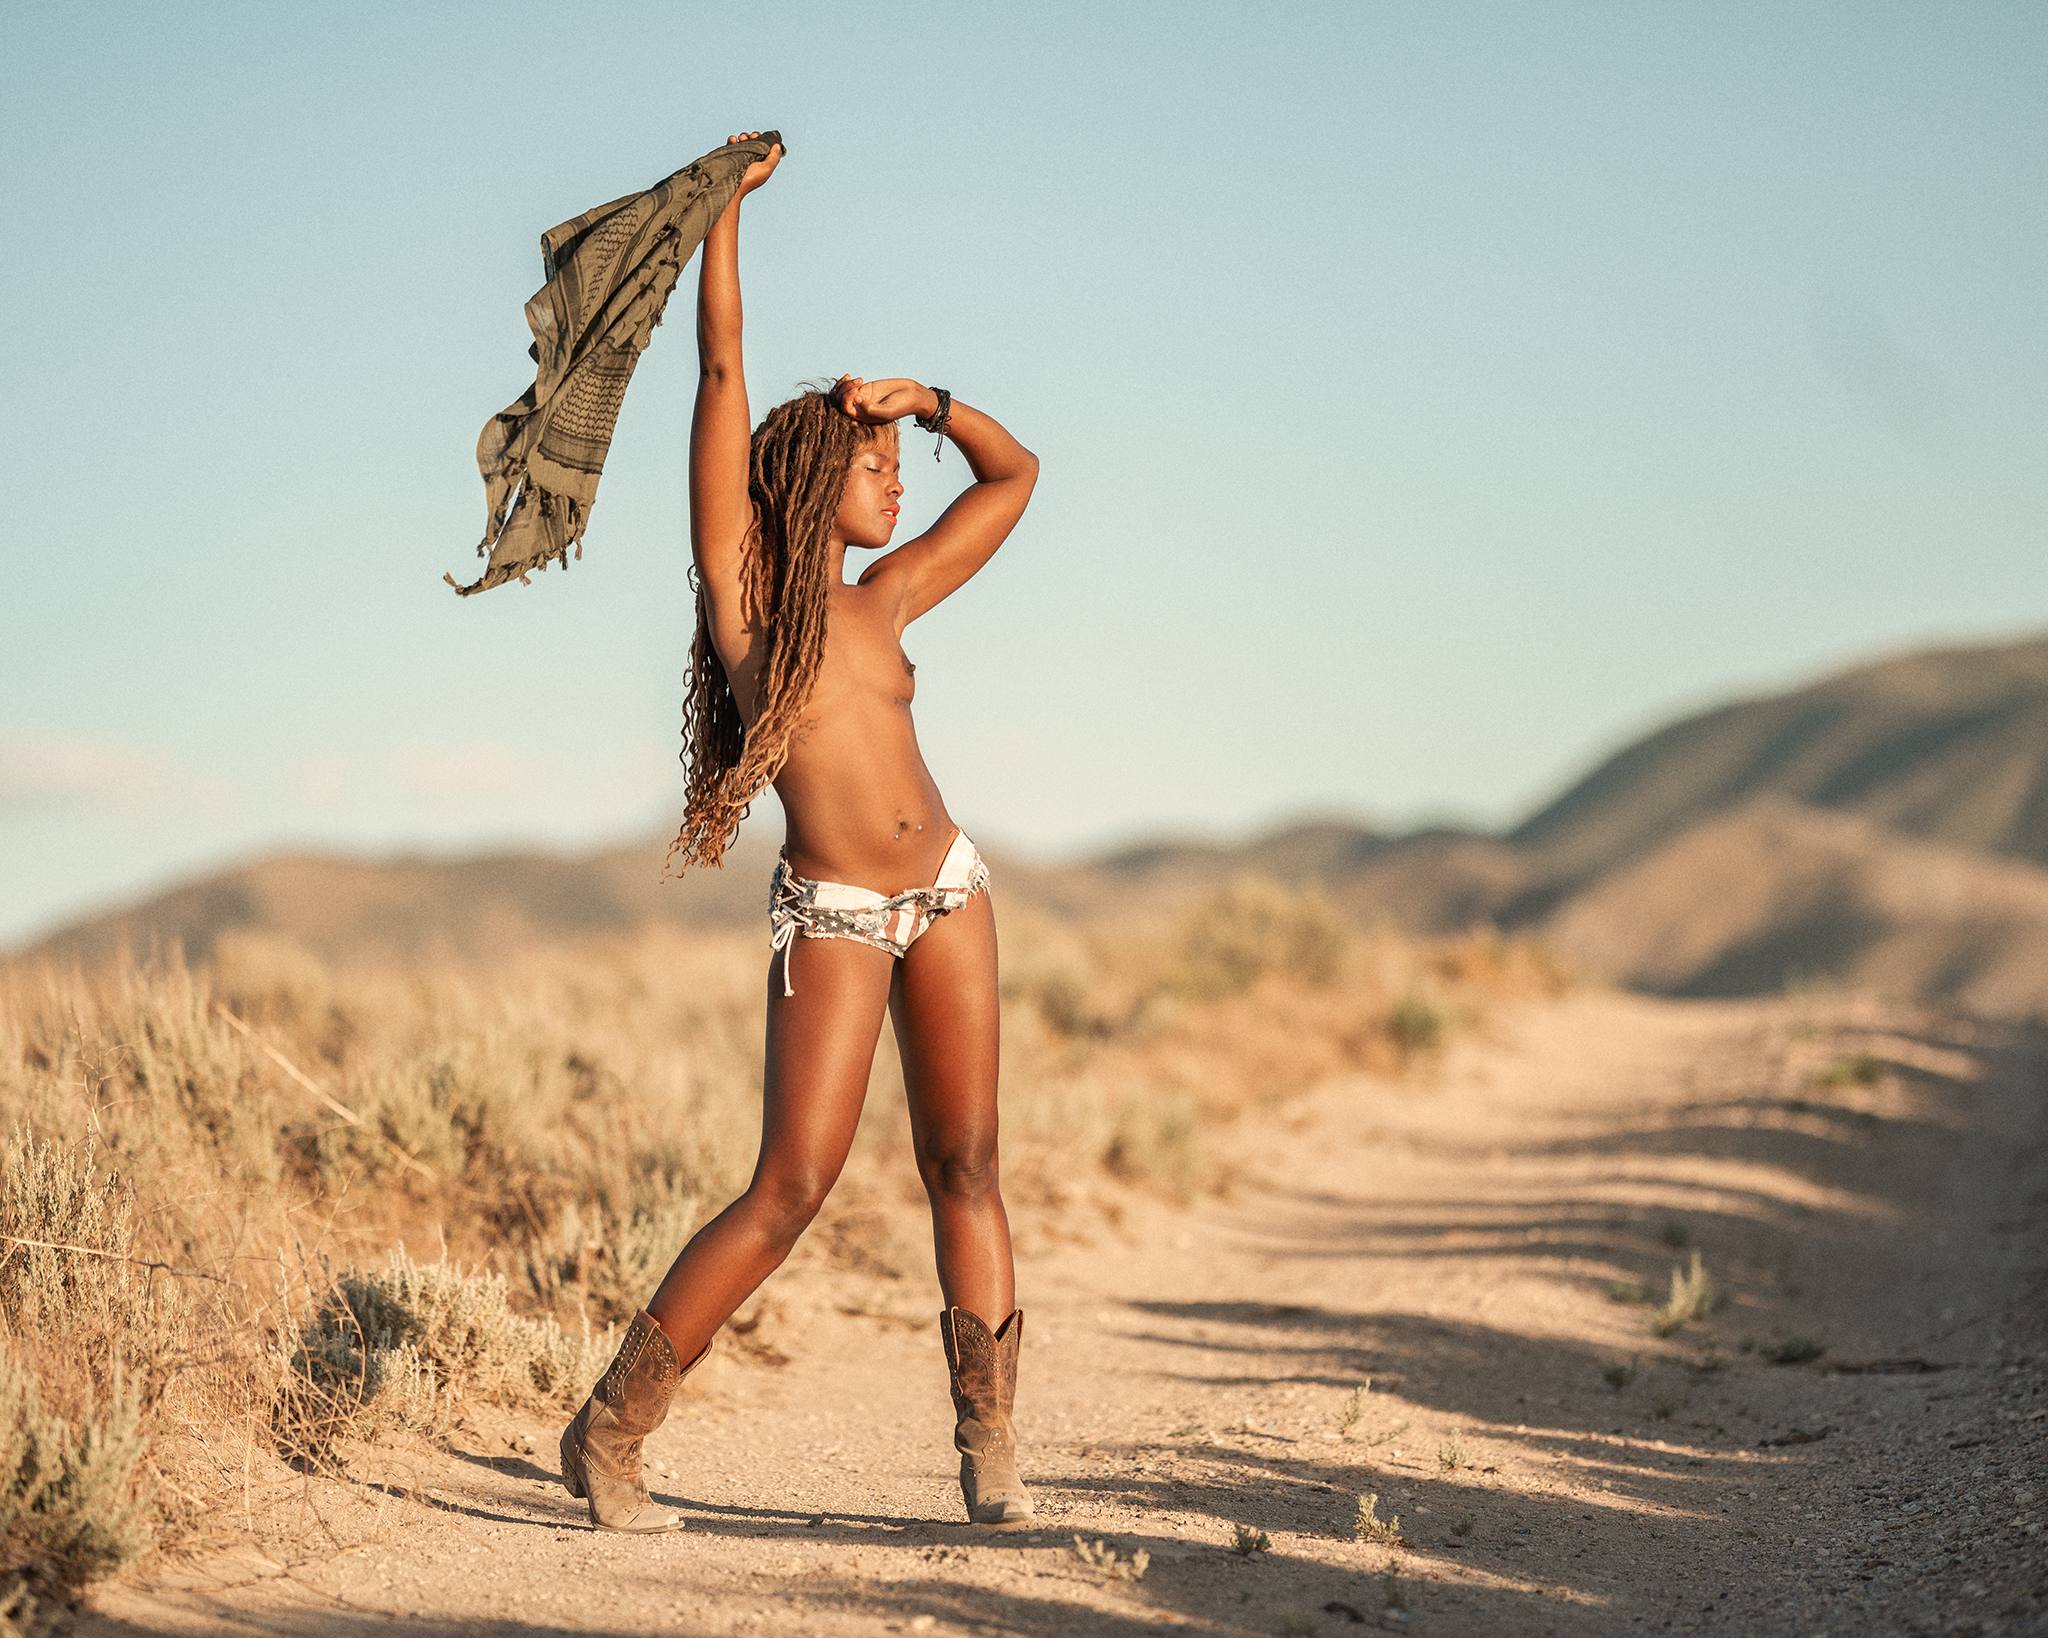
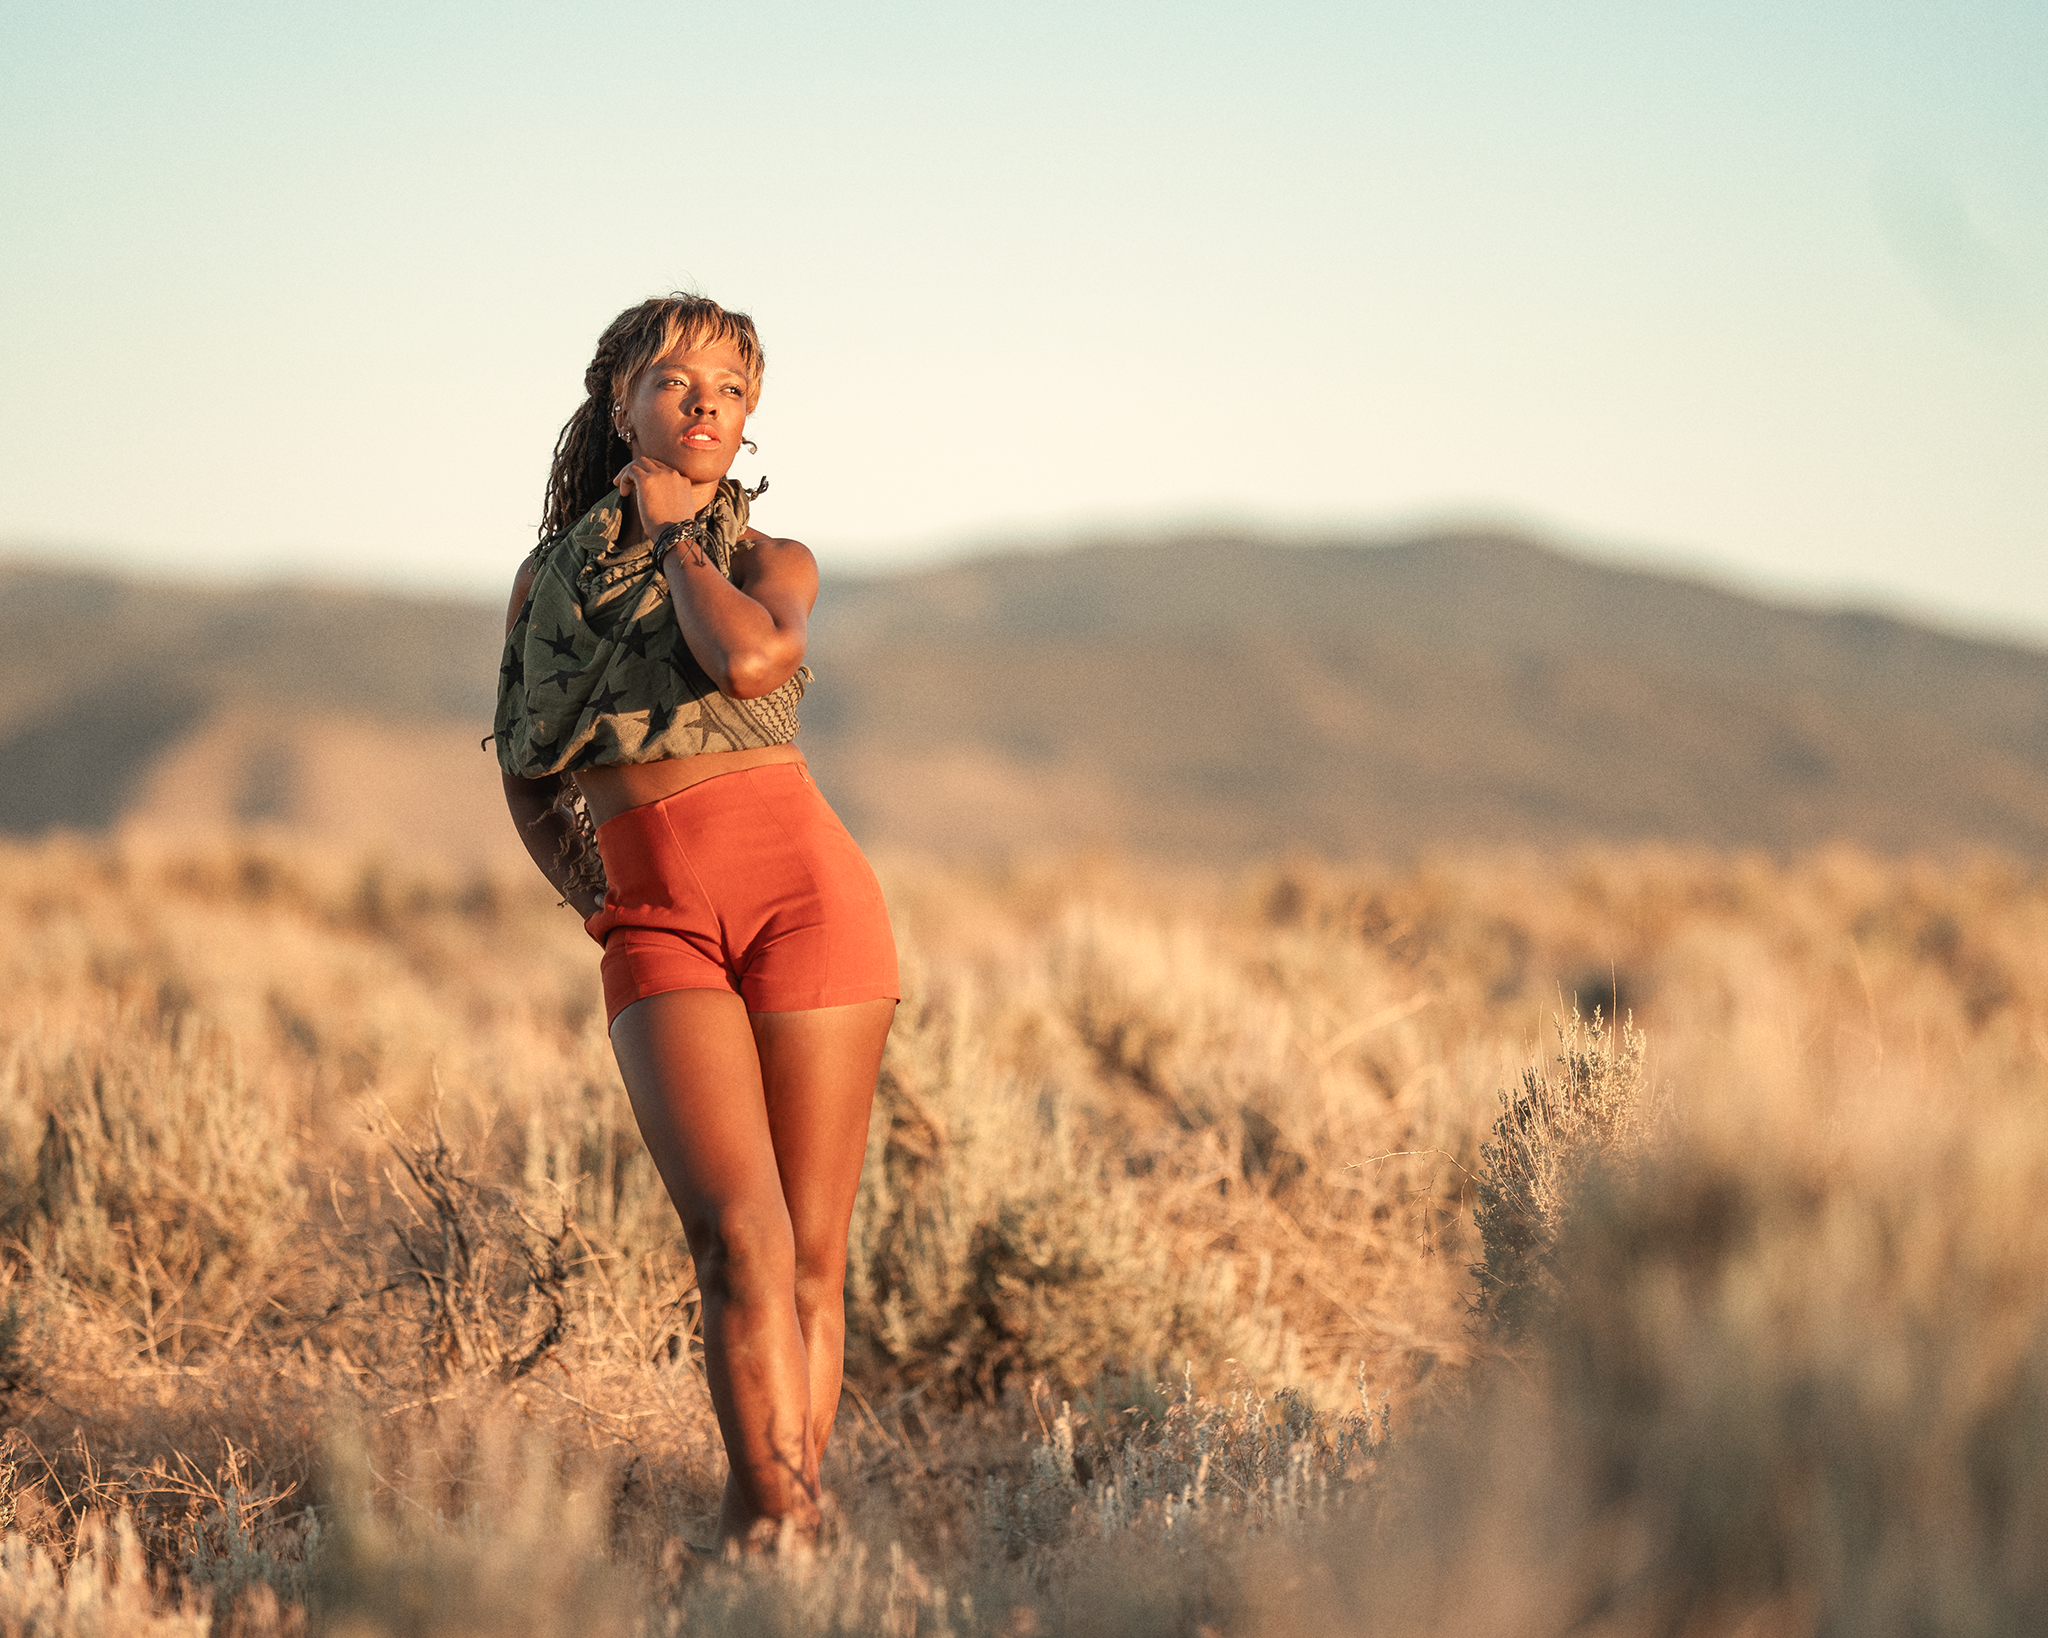
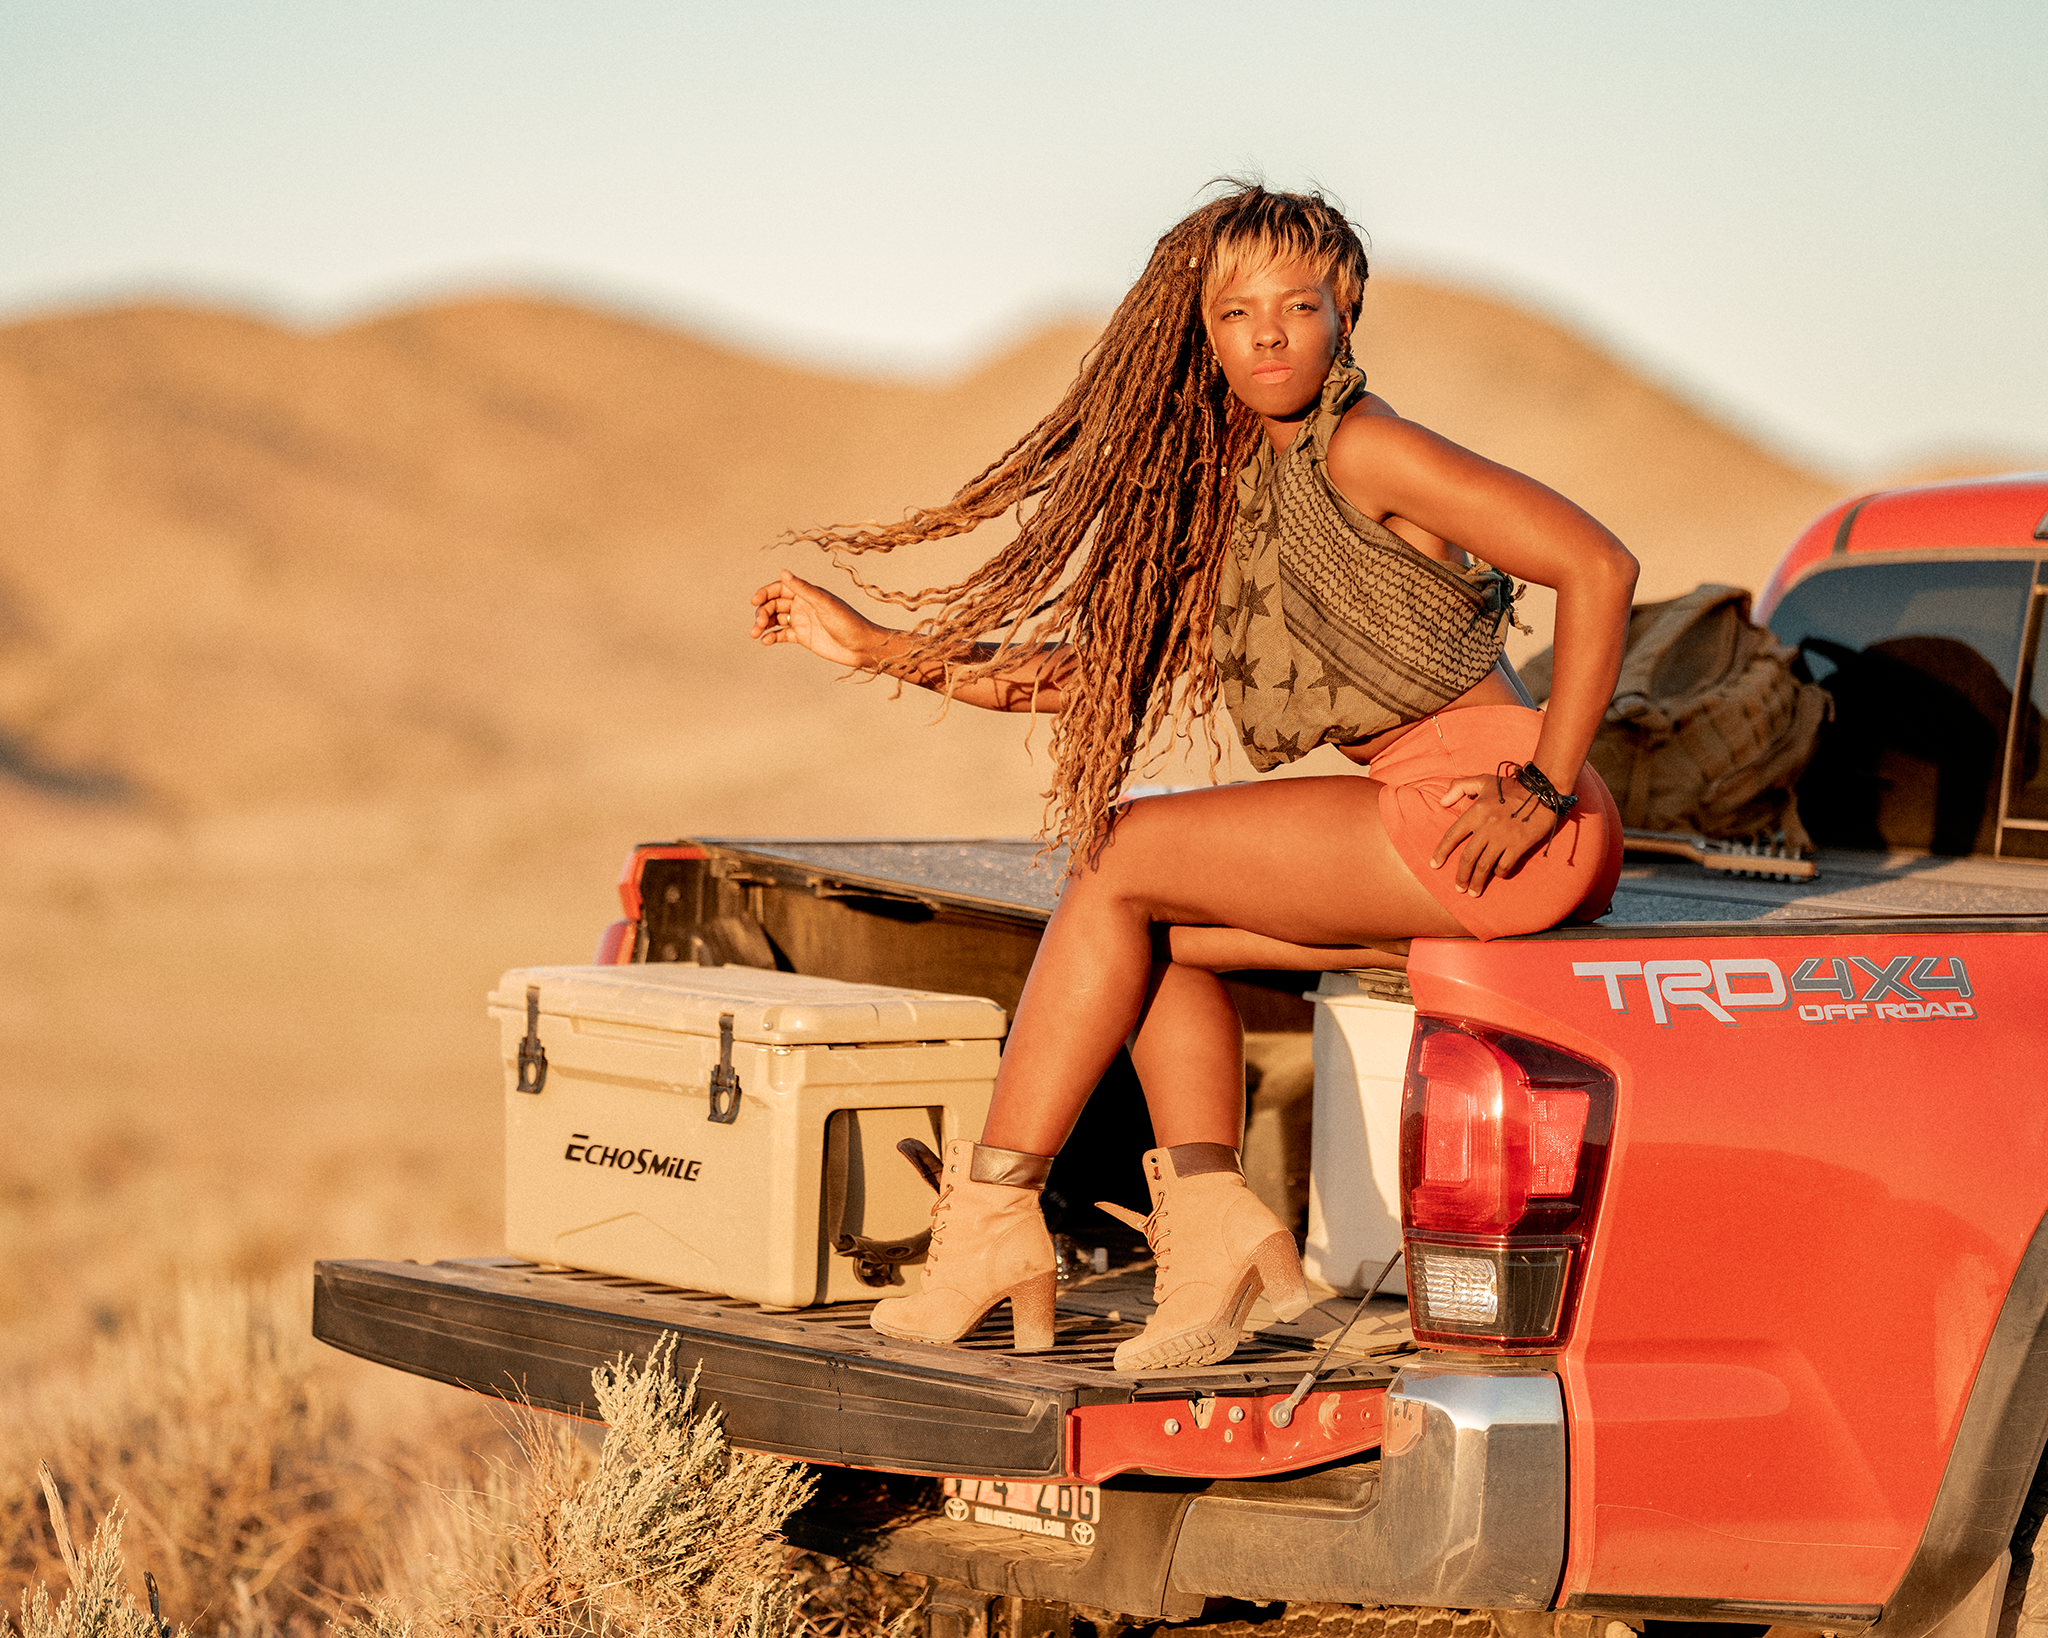
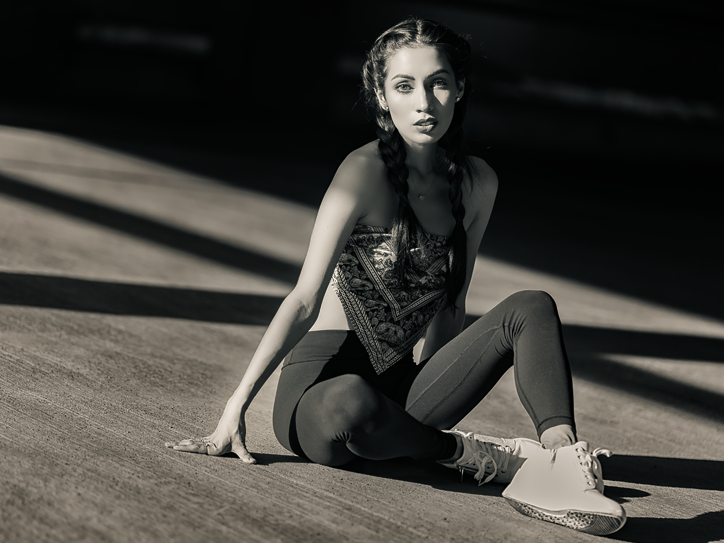
An interesting aspect of these photos is how much the light changes and, more striking, how much it changes on Lorato’s skin as the day progresses.
This was a very quick, off the cuff, run and gun shoot that started about 4:00 PM in pretty hard sunlight, transitioned into the most golden of golden hour light, and finally into twilight as the sun dropped behind the mountains.
When I first started editing these photos I found myself fighting the tones as the sun got lower. What I mean by that is that as the sun neared the horizon, Lorato’s skin became more saturated with yellow and orange tones. Golden hour was gonna golden hour. I struggled with toning down the golden hues on her skin. Finally, I just thought to myself, why?
I finally decided to just embrace the tones produced by the changing light.
As a photographer of people it can be difficult to develop your own style. It’s one of the questions I see often on the various groups or forums that I visit. It’s something that I’ve thought a lot about and I’ve actually come up with a way that works for me and I’ve implemented it. Keep in mind that it’s simply just my opinion. Though I’m primarily a people photographer I don’t see why it wouldn’t work in some other genres. Though it’s something that I think has worked for me, your mileage may vary. Also keep in mind that I’m coming from the perspective of an artistic people photographer. Sure, if your gig is pumping out hundreds of corporate headshots there are certainly conventions you’re going to need to adhere to. But that’s different. If someone is striving for their “own style” photographing people, they’re not hanging out a corporate headshot shingle.
Don’t listen to aesthetic opinions of other photographers
I know that it’s anathema to not reach out for criticism or “help” from other photographers, but I really think it’s the worst thing to do when it comes to aesthetic. One of the things that new photographers are told that they need to do to “get better” is to seek the aesthetic advice of other photographers. It’s an example of conventional wisdom that is just wrong. Don’t put up a photo in a public space and ask for criticisms or advice. Also, unfortunately, the world of photography is full of people who are more than happy to take it upon themselves to give you their unsolicited aesthetic opinions; something that has always baffled me.
Aesthetic–indeed art–is entirely subjective. Yes, I know there are those who have wasted a lot of money on an art degree of one kind or another who will argue with that, but it’s the truth. What may be visually appealing to one person can be trash to another.
I’m not saying that you shouldn’t reach out to other photographers for technical advice. New photographers should definitely do that. For example instead of just posting a photo and asking for blanket advice, you’re far better off, say, posting it and stating what your goal was; lighting, editing, etc. and asking for advice on where it was missed and how to achieve it. But in order to do that you need to first know what your goal is.
How you edit does not determine photographic style
This is a common trap that many new photographers fall into. They try to achieve a personal style through editing. Some will spend money on Lightroom presets with that goal in mind and there are a lot of people out there that are willing to oblige them. One’s personal style is mostly created with how they take a photo. How they edit it has little if any bearing on the style. It’s why you can look at a Peter Lindbergh photo that is black and white and look at another that is color and you can tell that both are a Peter Lindbergh photo. Sure, a photographer may have an editing style that they have a propensity to use, but that is not what identifies their style.
Some photographers who are well known for their style don’t even edit their own photos. They hire it out. The editing styles of their photos may have changed over the years, but their style is still evident.
Don’t get hung up on rules
As an artistic people photographer there are no rules. This kind of goes back to the don’t listen to other photographers point I mentioned above. Some of the most annoying rules to me are the compositional rules or the cropping rules. Nothing gets ravaged more in a public forum than a photo that is cropped in the middle of an arm or leg, or at the top of the head. People hung up on these things are just silly.
Some of the most iconic artistic people photos violate all kinds of rules and would be savaged on your typical photographer’s forum. Some of the most amazing fashion photos have crops that would make a rules centric photographer loose their minds.
Again, don’t worry about rules. At all. Focus on making photos that YOU love and ignore the opinions of other photographers.
Step by step
OK, I’ve bloviated on my opinion on various things, but how exactly do you go about working on developing your own personal photographic style?
Here is my approach:
Create a folder on your computer and name it whatever you want. This folder is going to be with you forever. As you peruse the internet in your everyday life, anytime you come across a photo that you love, simply save it to that folder. Don’t think about it too much. If you dig the photo, save it. It doesn’t matter where you find it; Facebook, Twitter, Instagram, fashion website, news website, forum, etc. It doesn’t matter where you come across the photos. If you really like it, just save it to that folder. But it’s important that you only save the photos that you really like; that really hit a nerve.
After some time–days, weeks, months–you will accumulate a lot of photos in the folder. When you open the folder you will see many photos that you’ve accumulated that you love. There will likely be a variety of different photos consisting of different types of people and editing, styles. It doesn’t matter. Though you may not be able to identify it at first, there will be a common thread throughout all of the photos. It may take some time to actually identify it. But trust me, there is a common thread. There has to be because all of the photos in the folder are there as a result of your personal aesthetic. There is only one you on a planet of 8 billion people. If all 8 billion people created their own folder of their favorite images there would be 8 billion distinctly different folders.
You will need to spend a fair amount of time in the folder looking at the images that you love. Eventually you’re going to realize the common thread. You may not be able to verbalize it, but you’ll know it when you see it. And when you create your own photos you’ll think of it. Make the photos that YOU love for your own reasons.
In time take some of your favorite photos that you’ve made and stick them in the folder. How do they hold up? It’s likely that initially, they won’t hold up in comparison to the other photos. If they don’t, then remove them. But it’s good to see how they stand up amidst all of the other photos that you love.
Eventually you will make some photos that absolutely hold their own according to your aesthetic. Even though they may look wildly different than many if not most of the photos in the folder, they will still ride on that common thread that runs through all of them. That thread is YOUR style.
I started this approach a few years ago and my folder contains many hundreds of images and I’m still adding to it.
Some time ago, during the waning days of summer, Inna and I spent a day wandering the mountains and taking photos. I had pretty much everything with me, including an off camera lighting setup, but was really hoping to not have to use it.
Fortunately I had a good friend and an assistant who was able to come along and hold reflectors and scrims which helped immensely in this goal. Also the fact that it was raining off and on pretty much made it impossible to use the lights anyway. This is the mountain west of the United States; Utah to be exact. The old adage of “if you don’t like the weather, wait 5 minutes” was very much in play.
For most of the day it was a mix of rainy, cloudy, cold, bright and sunny, and warm.
Whatever Mother Nature threw at us, we just made it work.
We started the day off by meeting at the studio at noon where Inna and I jumped into the truck while Brant–good friend and assistant–followed us to a local coffee shop. A day’s driving is always best when started off with coffee. I love the light in this place and I often times start off these lifestyle/editorial day long excursions here.
ISO 160, Sigma 24-70 2.8 Art, f2.8, 1/250
After taking a few photos at the coffee shop–onlookers taking it all in–we finally headed up to the mountains through rainy and dreary weather.
By the time we got to the location which is about a 40 minute drive, it started coming down real hard. Hard enough in fact that we ended up just staying in the truck for about a half hour until it stopped enough for us to not get entirely soaked.
ISO 100, 85mm, f1.8, 1/5000
Once the weather cleared it turned beautiful quickly with fairly heavy cloud cover and some great intermittent light.
ISO 100, 85mm, f1.8, 1/2000
One of the challenges in quickly moving cloud cover is that the light is constantly changing. But patience pays. Take your time and the light will come. Just be ready to take the shot when it does.
ISO 100, 85mm, f2.2, 1/1250ISO 100, 85mm, f2.2, 1/2500
As Mia wandered across the bridge, we decided to wrap up this leg of the journey and head to another location. Besides, it was getting a little crowded.
ISO 100, 85mm, f1.8, 1/8000
By the time the above shot was taken, the midday sun was coming out full force. A lot of photographers hate midday sun. Not me. I love it.
We loaded up and drove further up into the mountains. By this time the sun was pretty much directly overhead and I opted to use both a scrim and a reflector to help control it. Inna did a quick change, and we grabbed a bag full of clothes and headed out into an amazing meadow.
ISO 100, 85mm, f2.0, 1/640
In case you can’t tell, I love shooting with an 85mm lens.
ISO 100, 135mm, f1.8, 1/4000
But nothing beats a 135mm lens for a shot like the one above. I love the wild child vibe that Inna has going here.
ISO 100, 135mm, 1.8, 1/4000ISO 100, 135mm, f1.8, 1/2500
Time for another change-up.
ISO 100, 135mm, f1.8, 1/3200ISO 100, 85mm, f2.5, 1/640
This is an example of having a good collaborative team on shoots. We were getting ready to call it a day and head back to the truck, but really wanted to get one more look in. We were all a little tired by now. Brant, my assistant, came up with an idea, “Why not have her throw her jacket at the camera?
Sounds awesome to me. Let’s do it. I’m always willing to listen to any ideas that someone on the team has.
The photo below is about as carefree as it gets.
ISO 100, 85mm, f2.5, 1/400
This (below) was the last shot I took of the day. Let’s go celebrate!
Using flash to make natural light photos might seem counterintuitive to some, and it might drive some natural light photographers a little nuts, but hear me out.
There’s obviously nothing wrong with embracing natural light and natural light only for portrait photos. If the light is there and you can get the look you want from it, go for it. But often times the natural light just can’t quite cut it on its own; at least for some of the looks I want. The looks I’m talking about aren’t necessarily those in which a flash is obviously used; that flash look. I like that look sometimes. It’s a pretty common look nowadays.
Here’s an example:
To me it’s obvious that a flash was used on this shot. The biggest tell is the fact that it’s shot against a bright background that isn’t completely blown out. In fact it’s shot directly into the sun. That’s the little blown out area you see. But the model, Cindy, is properly exposed. Combined that with the catchlight in the eyes and and the shadows from her legs, yes, this used flash. In fact the use of flash is as subtle as a sledge hammer on the head. That’s ok, though, because it’s exactly the look I wanted.
For this shot I used a 60 inch octa just slightly off axis, camera right.
Remember, light is light. It doesn’t matter where it comes from. Whether it comes from the sun, a lamp, a speedlight, or a strobe, photons are photons. There’s an old joke about using available light, and then pulling out a flash you have with you because it’s available. Yes, cheeky, I know, but it there’s a lot of truth to it.
For many outdoor shots, I tend to use flash even though when I do it’s not obvious. In fact I like to use flash wen when my goal is to create something that is going to look natural.
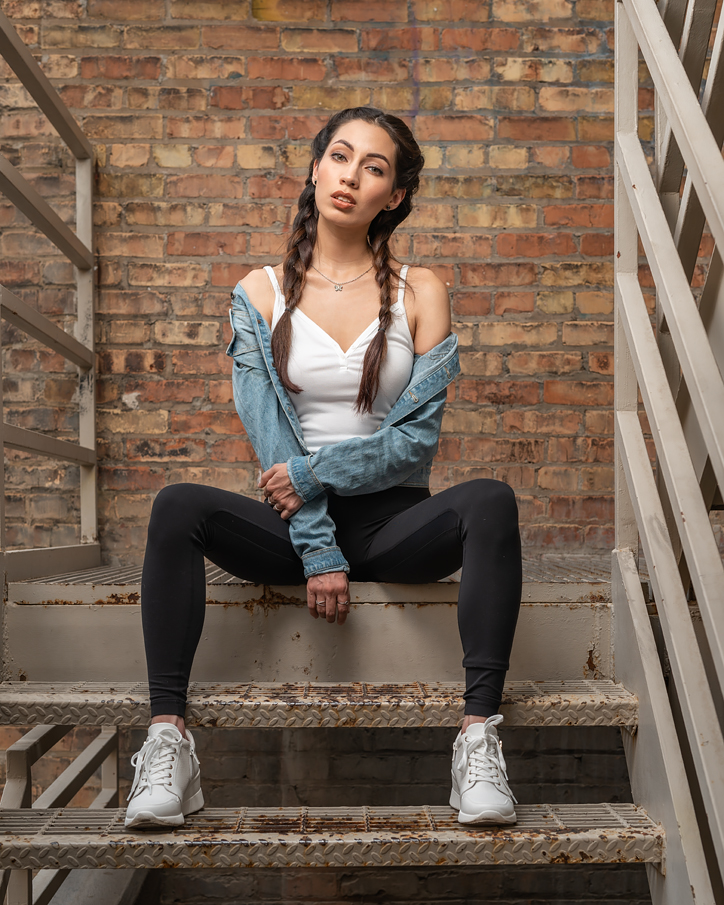
Can you tell if this shot is using flash or not?
I would venture to say that many, if not most, would say this was shot without flash. There are no telltale indications that a flash was used. It looks as if there would have been no need for flash. But when viewed at full resolution, you are able to see a subtle catchlight in the eyes that look like it could be from a soft box of some sort.
But, yes, this shot is done with a flash. I had an assistant hold a speedlight in a 28 inch octa about 45 degrees to the model’s right and about 45 degrees up from eye level. This spot is a little recessed nook off of an alley. Camera left is the alley. Across the alley is a concrete building which provided a huge bit of bounced light coming over the rooftops camera right. But during this shot, the rooftops were blocking direct sunlight. So, we made our own with just a tiny bit of fill.
Yes, I could have bumped up my ISO or slowed down my shutter speed, or opened up my aperture (or all three). But for this shot, I wanted to shoot at f4.5 to make sure that all of Cindy was in focus and just a little fall off on the wall behind her. Also, I wanted to keep my 50mm lense at no more than 1/200. The reason for that is because we were running and gunning around downtown, trying to beat the light. I was huffing a little bit and not entirely steady.
So why worry about it? I just decided to use my available speedlight.
What about this shot?
Natural light or flash?
This shot is a mix of both natural and flash. The sun, almost directly behind the camera, had settled behind buildings thus direct light on Cindy was blocked. I wanted to get the city in the background in a good exposure, but doing so left Cindy darker than I wanted. So I used a 60 inch octa just camera left and just a tiny bit of flash to fill in a bit. It really allowed me to balance Cindy with the background exactly how I intended.
In all of the examples I’ve shown I could have easily gotten photos of Cindy. There’s no doubt about that. But I would not have been able to get the shots I wanted. I would argue that, first shot excepted, I could have gotten what I wanted with a reflector instead of a flash. But, for me, flash is a lot easier because it’s more predictable. I also typically use an assistant on these kinds of shoots which really makes it easy.
Without light, photography doesn’t exist. If you’re a photographer you have to learn to see the light. If you’re not seeing the light, then you’re severely handicapping yourself.
Notice I didn’t say find the light. That goes without saying. But learning how to recognize it, you don’t have to find it. It comes to you. I can’t tell you many times I’ve gone into a session with a specific goal in mind and stumbling upon some light that just caught my eye and I couldn’t simply move on; I needed to take advantage of it.
That’s called seeing the light.
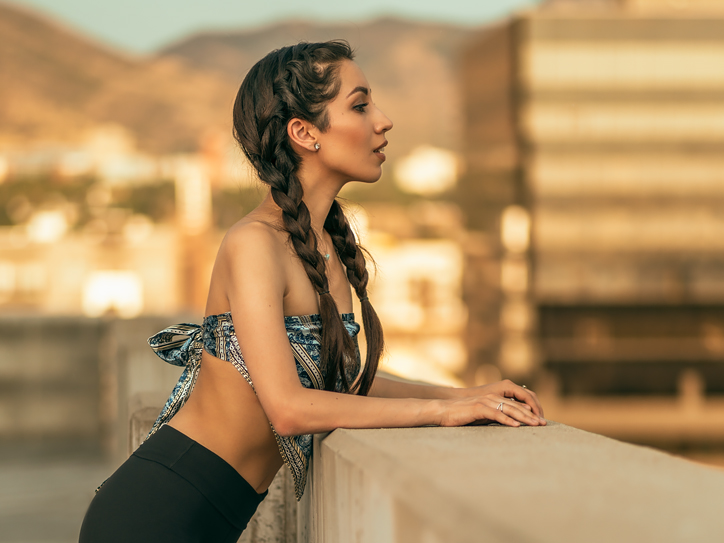
Earlier this summer I was doing an uptown shoot with an amazing model, Cindy. I had an assistant along with us to help with holding a flash. I like having flash because it means that I can find a location and, if need be, mold the light to what I need it to be. We wandered a few square blocks downtown taking shots at various locations. All of this was with the intention of wrapping up the session with a rooftop golden hour location. The intention being to use a strobe to balance the light.
We did do that rooftop location exactly as I intended and envisioned it. But while driving through the garage to the rooftop, I stumbled on some amazing late afternoon light coming in at a low angle into the parking garage. The light was broken up by low walls and huge cement beams which created some amazing shadows. Right away, the whole thing hit me like a sledgehammer.
This is a time and place to get some shots.
Cindy and I parked, jumped out of the truck, and spent about 2 minutes snapping some shots. This is the kind of situation that a good model really pays off. Light like this is fleeting and you don’t want to be racing against rapidly changing light to get the shot.
This is the shot we got:
Model: Cindy, ISO: 125, 85mm, f1.8, 1/800
I love the strong shadows, leading lines, and strong light on her face.
We got a lot of great shots during the session, but this is one of my favorites. It’s one of my favorites because of the light that I simply stumbled across.
Lately I’ve been doing some experimentation in an attempt to recreate some old school Hollywood glamour shots along the lines of George Hurrell or C.S. Bull. The other day I had my friend Yana stop by to do some modeling. She’s perfect for this sort of thing because she has that very classic beauty that was often evident in the bombshell actresses of the day. Keep in mind that this was a practice session in preparation for a real shoot in a few weeks in which we should have some good retro hair and clothing styling.
I asked Yana to come with little makeup; just lipstick and a little eye mascara. From what I’ve read, photographers of the genre preferred their talent to be similarly nearly makeup free. She also brought along a dress to roughly approximate a vintage look. Like I said, a bit later we’ll do the styling right, but this is a practice session for me to begin to get a grasp on the lighting and retouching.
I draped a faux fur spread over a small step ladder and had Yana position herself sitting on the floor and leaning back against it.
For the shot in this post I used a lighting setup like this:
Hollywood glamour lighting diagram
I had Yana’s body basically face the camera and her face turned towards the key light which was camera right and pretty high. You can tell that it was high by the prominent “Paramount” light under her nose. The key light is a Xplor 600PRO fitted with a 7″ reflector and a 40 degree grid.
These kinds of shots are not easy for a model because they have to hold a position for quite a while. This is a completely different approach than what a lot of models are used to. Most of them are used to working in a manner in which they are moving a lot, flowing from one pose to another after each click of the shutter. A sort of rhythm. But for this kind of thing it’s much slower paced. It’s not easy holding an exact pose while the photographer moves the light around or directs subtle movements in search of the perfect shadows. I had her assume her pose and then then move her head just slightly until the shadow was just right. I popped off a couple shots to make sure the key light was as needed.
While holding that position, I moved the hair light which is camera left, more or less behind the model almost in line with the key. This light was a Flashpoint Zoom R2 Manual with a Rogue Flashbender rolled into a snoot. I moved it around until it was popping off of her hair. The third light, Also a Flashpoint Zoom R2 Manual was fitted with a Rogue 3 in 1 Grid and pointed at the wall behind the model and just a little right. The idea being to add that dimension you often see in the old Hollywood glamour shots.
I set my camera to 1/100, f8, and ISO 100. For this shot I used the Nikon 85mm 1.8G.
I asked Yana to give me her best Hollywood diva of yesteryear look.
This is what I came up with straight out of camera:
Hollywood glamour straight out of camera pre post processing.
I don’t know about you, but this is not bad. It took me a bit to get to this point; a few test shots and getting that shadow under the nose just right. I also wanted the light carve out her cheeks a bit, too. I had to adjust the power of the hair light to just start clipping some of the highlights.
At this point, in Lightroom, the only thing I did was bring down the shadows a bit and then sent it over to Photoshop. Now, this is where the real fun begins. Keep in mind that the retouching was easily as important as the lighting for the old school Hollywood shooters. The idea was to create an image that was almost super human. To be honest, my inclination is to keep things pretty natural. But for this exercise, natural is exactly what we don’t want. The first thing that I did was use the Healing Brush tool and the Patch tool to remove every freckle, blemish, mole, etc., that I could find. I also made a cursory attempt at dealing with some fly away hairs, but didn’t pay too much attention to them.
I also added a Curves layer to crush the left side of the image a bit by burning it in. Next I added another layer and used Liquify to reduce some of the puffy fabric on the dress under her left elbow. After that I created a new layer with a soft light and 50 percent gray and burned in the right cheek just a tiny bit.
One thing that bothered me a bit was that the eyes and teeth were a bit obscured. To deal with that I created a layer and then used Nik Software’s Detail Extractor and then painted it in over the eyes and teeth in a Layer mask. I also painted it in to each pearl on the necklace. It’s pretty subtle, but it makes quite a difference.
For the skin, normally I use a form of frequency separation and go pretty light, but since this is Hollywood glamour, I pulled the best tool for overdoing it I could think of; SkinFiner 2. It actually works pretty good for more subtle skin smoothing, but in this instance I was anything but subtle. I left it at its default setting, created a layer mask and painted it in on the skin.
This is the result after all the retouching:
Hollywood glamour after retouch.
As you can see, it’s pretty heavily retouched. It may be difficult to see in this smaller resolution, but it’s way overdone by today’s standards. But not for back in the day.
The next part was the black and white conversion. For this I used Nik Software’s Silver FX Pro2. It’s probably the most awesome tool in the Nik suite. It’s a great black and white conversion tool.
Anyway, in Silver FX, I just started with the Default Neutral and added just a touch of contrast and a tiny bit of brightness. In the Color Filter module I added a Green filter to make that red lipstick a little darker and reduced the strength down to about 75%. Then I went to the Toning module and selected Coffee number 14 to give it that subtle toning that you see in many photos of the Hollywood golden age. I brought the toning strength down to about 30%.
The next step was to again go to Nik Software. This time I added another layer and then used Color FX Pro 4, specifically Glamour Glow. I pretty much left it at default, but reduced it a bit to about 25%. This creates an almost perfect representation of that kind of soft gauzy thing many images had going on back then. I then created a Layer Mask and painted the effect out of the eyes. I’m sorry, I love my sharp eyes.
After that I did a 1 px High Pass sharpening over just the retinas in the eyes and called it good.
This is the end result:
Hollywood glamour final result.
I think that it generally looks pretty good and in many ways is decently representative of the style of Old Hollywood glamour. No, it’s not perfect by any means. The right hand is a bit bothersome, the hair styling isn’t quite there, but it’s all a good start. And I learned a lot by doing this little project. Also, Yana, the model, is just amazing. She really does have that classic Hollywood beauty.
After doing this little test/practice shoot I’m pretty excited to do a full blown Hollywood glamour shoot with some great vintage styling.
Here are some other shots from the session. Each one has a bit different toning:
Lately I’ve been doing some research into a specific genre of photography known as Hollywood glamour. Typically, when one thinks of Hollywood Glamour it’s a given that we’re talking about publicity photos from the so called Golden Age of Hollywood. It’s a very unique style of photography that was pioneered by photographers like George Hurrell and Clarence Sinclair Bull. Though there were others these two really exemplify the style of Hollywood glamour of the Golden Age. Arguably, George Hurrell is the defacto Hollywood glamour photographer that set the standard to which all others are compared.
One thing that is interesting to me is that although both Hurrell and Bull were both tasked with creating publicity photos and they were aesthetically similar at first glance, in reality they were actually quite different in some ways. Generally, although Bull could be as noir and contrasty as any of them, he tended to produce works that were less so; more open shadows than Hurrell. I have the feeling that Bull’s work is probably more aesthetically in line with today’s eye. That’s just a guess, though.
I will admit that, personally, I generally prefer Hurrell’s work over Bull’s, but they were both just amazing at what they did.
Hedy Lamarr by Clarence Sinclair Bull
The shot above of Hedy Lamarr by Bull is quite representative of his work.
The one below of Jane Russell by Hurrell is, I believe, quite representative of his work:
Jane Russell by George Hurrell
You’ll notice that Hurrell’s pic of Russell really hits the contrast. He wasn’t afraid of shadows in the least. Now, of course, there are plenty of shots by either that are practically indistinguishable. But I think that these two are example of how they did differ.
Something that I find interesting is that I bet if Hurrell and Bull were alive today, not famous, and posted these exact same images on a portrait critique forum, they would be heavily criticized for all kinds of reasons; too hard of light, over processed skin, wonky cropping, etc.
Another thing that is apparent that is almost anathema for modern portraiture is the often missing catchlights in the eyes. Yes, there were often catchlights, but there were often no catchlights, too. Whatever the criticisms may be, there is just no denying that these two gentlemen created amazing works. Though they both were different from each other, they both managed to create almost otherworldly beings; something that was required by the Hollywood studios of the day. Their goal was to represent their talent as beyond and above the average person. And, boy, did they succeed in doing that.
Completely unrealistic, but oh so amazing.
Which brings me to the issue of post processing. Today a common refrain is the over use of post production. It’s often blamed on Photoshop or other post processing software; as if it’s a new phenomenon. We talk about the over use of Instagram filters and bemoan the lack of reality in today’s glamour portraiture. But the reality is that it’s nothing new at all. It’s just done in a different way. Both Hurrell and Bull relied extensively on post production. They spent hours in the dark room dodging and burning, shaping arms, cheeks, and bodies, and smoothing skin; all in an attempt to create a sort of perfection beyond the reality. In fact the movie studios employed many more retouchers than photographers.
When it comes to gear they used mostly 8×10 portrait boxes and repurposed film studio lights. Looking at the photos, generally, there seemed to be a key light, a hair light, and a background light to light up the background adding a more dimensional quality. A big limitation of the gear that they used was the fact that they typically had to rely on long exposure times, perhaps up to a couple of seconds. This is one of the reasons you see most of the poses like they are; seductively lounging, reclining, resting their heads on hands, etc. Yes, these kinds of poses tend to appear sensual, but they served a purpose, too. They are the kinds of poses that are easier to hold for long periods. So, when you look at the photo of Jane Russell above, lying back with a “I’m waiting” demeanor, there was more to it than that. It’s the perfect pose to exude sensuality and hold for a long exposure time.
When it comes to closely replicating the look of Golden Age Hollywood glamour it can certainly be done with modern cameras and lighting gear. Some would have you think that it just can’t be done without a spot and a Fresnel lens, but that just isn’t so. For example, Robert Harrington shows how it can be done using nothing more than speed lights in this video:
Is it exactly like a George Hurrell photo? Maybe not, but it certainly is very close to the style. The key, really, is to use a three light setup and choking down the light. Harrington uses snoots on both his key and hair light, and a grid on the background light. In the old days they used Fresnel lamp lenses to focus and concentrate the light, and barn doors as well as flags. Today it can be accomplished using grids and snoots along with flags if needed. Yes you could use barn doors and Fresnel lenses, too, but it’s not really necessary.
The one thing that I might do differently than Harrington would be to use studio strobes rather than speed lights, at least for the key. I think a modeling light would come in very handy in finding just the right shadow.
Something else that I notice is how the talent performed. Typically when shooting models they tend to get in a flow. By that I mean they sort of sync with the photographer and are moving a lot. The flash pops and they switch to a different pose. Flash pops, switch it up. It’s easy to bang off a lot of shots and then comb through them for the keepers.
Obviously the nature of digital more easily allows for that. However, in the day of Hurrell and Bull, each shot was almost a production in and of itself. They could take several minutes creating a single shot. They would have the talent assume a pose and hold it. They would then move lights around to create just the right shadows. Sharon Stone has talked about doing a shoot with Hurrell in which she was lying on a bed with a tea service, in her pose. Hurrell moved some lights around, looked at the scene and then went up to Stone and adjusted one of her fingers just so. He then finally took the shot.
Anyway, I think the whole thing is extremely interesting. And I think that there is a lot to be taken away from these masters of the Hollywood glamour shot; something that perhaps has been washed away a bit by technology and the ease in which photos can be taken in today’s world.
Early this summer I had an idea of a photo project I wanted to do. First I wanted to do something with a vintage flavor to it; pseudo vintage, really. Beyond that I didn’t really know exactly where I wanted to go other than I wanted it to be a sunset portrait shot.
As the summer progressed my wife and were wandering through a little antique shop in a tiny town in central Idaho, New Meadows. It’s the kind of place that has a lot of things from the old ranches all over the valley and estate sales. We came across an old 50’s era suitcase and right away my wife said she wanted to incorporate it into some kind of shoot. That’s when my idea began to really take shape; a vintage style shot of a woman with the suitcase on a roadside.
No, not exactly original, but still fun sounding.
My wife was all on board with the idea so we bought the suitcase.
We spent the next few weeks trying to think of some kind of wardrobe. It definitely had to be a vintage style, but where to get something like that?
I did a search for local vintage clothing shops and found a great little place here locally called Retro Betty, a shop that specializes in vintage style clothing, mainly spanning what appears to be the 40s and 50s. Apparently vintage style clothing is a thing. Anyway, we managed to find a couple of cool looking dresses. I told the owner of the shop what our plans were and she was pretty excited. I told her I would tag Retro Betty on Instagram when I got them done.
The next step was finding a good location. What I had in mind was a remote straight road. Paved? Unpaved? Who knows? I did want whatever stretch of road I used to run east and west so that I could fully utilize a setting sun like I envisioned, but that was about it.
Also, for what I had in mind, I was going to have to use off camera flash. Shooting a portrait directly into the setting sun was definitely going to require a good powerful flash to do it right. I also wanted to shoot with a fairly open aperture which meant that I would also either need to use a ND filter or HSS. Since I had just picked up a Flashpoint XPLOR 600 PRO, it seemed a bit like a no brainer.
So one day we loaded up the truck with the XPLOR, a heavy C-stand, and a 38″ deep parabolic softbox and headed to the west desert in Utah. Just as it was getting time to either shoot photos or go home we finally found a perfect location; a dirt road running east and west and the sun setting towards distant mountains. I set it all up and we took a number of shots:
Sunset Traveler–Model Anna, ISO 100, 85mm, f2.0, 1/1250
This is my personal favorite. I think because it seems to convey a bit of a story beyond a pretty woman standing on the side of a road. What is the story? I don’t know, but something.
This one is kind of an odd shot in that it goes against so many conventions; cropped off feet, flower in the foreground, that kind of thing. But I still like it because it kind of has a cinematic vibe going on. The model is caught in mid-motion looking down the road. Waiting for someone? Who knows?
Road Side Attraction Model: Anna ISO 100, 85mm, f2.0, 1/1600
Keeping with the roadside theme:
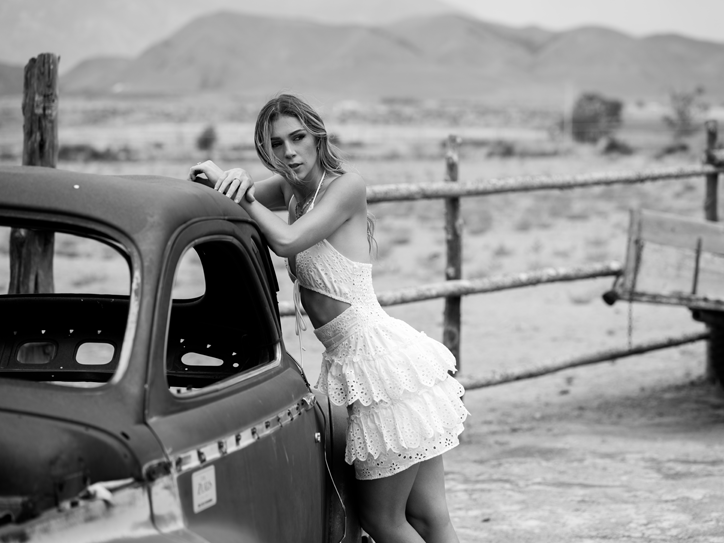
Circa 1957 Model: Anna ISO 100, 85mm, f2.0, 1/1250
This one is the favorite of the vintage boutique shop owner from which I got the wardrobe. Again, a very cinematic vibe going on. A few technical nits aside these shots are almost exactly what I had in mind. I love the colors produced by the sunset; the yellows, reds and vague pastels, the desert location, etc.
We purchased a couple different dresses from the boutique shop. This one is more late 50’s while the other one is more mid 40’s. I’m going to do a shot with it as well, but I’m thinking I want it to be indoors in a vintage interior setting. I haven’t quite got that one figured out yet.
But I’m working on it.
I think doing these kinds of projects is not only fun but they are great learning tools. To have a vision in mind and then take the steps needed to see it through offers a lot of learning opportunities.
What are some photo projects you’ve done? What are some that you have in mind and plan to do? I’d be real interested in hearing.
Finding models to photograph can be a real challenge at first. Sometimes it’s all about meeting the right person at the right time. But it’s doubtful that you’re going to meet them unless you’re doing things that one does that leads to meeting people. It sounds simple enough, but trust me, it’s not always that simple.
As I’ve progressed down this photographic path I’ve noticed that my interests have really been solidifying into photographing people. I’ve dabbled in street photography and it’s OK, but not really my cup of tea. I’ve photographed family members and that has worked out pretty well. Fortunately my wife, for example, is generally game for my photographic ideas. And even more fortunately she is particularly qualified; she’s tall and athletic. I love taking photos of my wife. Some of my favorites are here, here, here, and here. But the fact of the matter is that she’s not exactly enthusiastic about it. She doesn’t mind it, she can take it or leave it, but there are times when she is definitely indulging me.
Bless her heart.
I’ve often thought that I would love to shoot other people just to mix it up. I’ve even dabbled a bit in Model Mayhem, but it hasn’t been fruitful at all. I’ve gotten a lot of people there that say, yeah, I’m all in, but then you don’t hear from them.
Oh, well. It is what it is. And then I’m back to the conundrum of finding models to photograph. But what to do?
A while back I started doing the 100 Strangers Project for the simple reason of forcing myself to approach people and to get a decent shot in a quick and impromptu situation. It’s a whole other skill set that I’ve noticed adapts well to photography in general. My project is, at this time, currently on number 9. It’s been a lot of fun and I’m so going to finish it. In fact it’s probably something that I’m going to continue indefinitely.
So, you may be wondering what this has to do with finding models to photograph. Well, my wife, being the awesome supportive wife she is has been totally on board with the 100 Stranger thing. Often times when we’re out and about she’ll point out a particular face and say, “Man, you should try to get a shot of them.” That kind of thing. That’s how this Stranger shot came to be. Every weekend we go to Costco and do our weekly food shopping. One of the people that works there, like my wife, is a fellow emigre from Ukraine. Because of this shared background they have talked a few times. A few weeks ago they were chatting and I had my camera with me in case I had a Stranger opportunity. A few times I had thought about asking Yana for a Stranger pic, but every time that I’ve seen her in Costco she was so busy that it just wasn’t a possibility. During this time, however, she looked at my camera and asked, “Are you a photographer?” Right away my wife jumped in, “Yes, he is. You should have him take pictures of you, you’re beautiful.”
Right away Yana said, “Yes, I’d love to do that. Do you have a card or something?”
Of course I always carry a card with me. Note, always have a business card on you. Even if like me you’re not a “pro.”
A couple of weeks later using the email address on the card, Yana reached out to me to see if we could get together.
Awesome.
We set up a time to meet at a local park on a weekend. As we communicated via email Yana let me know that she had never done anything like this before, but she was game.
My wife and I met her at the park and we took a few shots. My goal was to get one for my Stranger Project. At this time I still considered Yana a “stranger.” It also gave me an opportunity to mess around with my reflector.
She was a bit nervous, as was I; not quite sure how to approach it. I just treated it like a normal Stranger session and asked her to just look right into the camera. We came away with this shot:
9 of 100 Yana
Technically it’s not a great shot. I could have done a lot better. I’ve got some blown highlights, a bit of upward lighting going on (messing with the reflector), but one thing is certain. The only reason that this photo is even remotely usable is because Yana is just so amazingly photogenic. She naturally engages the camera and just rocks.
After we took a few shots we decided to get together for an actual photo shoot; one in which we actually plan a little and spend a bit of time. So we planned to meet at the same park and go from there. This time I took some off camera flash gear; a simple speed light and umbrella. I had a particular place in mind, but after we met in the park I decided to get a shot there in a place that the lighting was particularly good. I’m not experienced at all with directing people to pose and Yana is not experienced at modeling. But we came up with this shot; the first real shot:
Yana ISO 100, 85mm, f1.8, 1/800
I like this shot. A lot. For me, it goes way beyond a simple photograph of an attractive person. It conveys something. Exactly what I don’t know, but it’s something.
A couple of weeks after that first real session we got together again. This time at a local place that is popular for people taking Instagram shots. It’s called the Cents of Style Wall. You’ll notice looking at their page that most everything is pretty Instagramy for lack of a better word. But it’s cool in that there are ready painted walls to stand against. I wanted to do something a bit different than what most people are doing with this wall, though.
This is what resulted:
Yana ISO 100, 85mm, f2.0, 1/1000
Yana just exudes awesomeness in this pic. The way she engages the camera is, in my opinion, what separates a picture of a pretty woman from, damn, girl, you look like a freakin’ model.
Again, she was a bit nervous; a bunch of people standing around, trying to take direction, posing.
Here is another from that session:
Yana ISO 100, 85mm, f1.8, 1/640
Again, the engagement is just great.
After a few more weeks we got together again. This time in my little home studio. My wife and I invited Yana over to visit and do some pics. Since both my wife and Yana are from Ukraine they talked a bit about, well, Ukraine and drank a bit of tea.
I wanted to experiment with some very contrasty lighting using just a single speed light through an ExpoImaging Rogue 3-in-1 Flash Grid. It resulted in a very concentrated narrow beam of light. I placed the light camera left and we came with this:
Yana Noir: ISO 100, 50mm, f5.6, 1/200
This is a radically different look. Some may not like the heavy contrast, but I love it. And, again, Yana does an amazing job.
The point of this whole thing is that finding models to photograph is a challenge; especially when you’re just some schmo like me who would not exactly qualify as a “pro.” Just getting out there and jumping in and asking people, though certainly not easy, is really the only approach. I think finding someone new with whom you can experiment and grow together is quite fortunate. I’m always learning and growing as a photographer. Yana, here, has definitely progressed as a model. I think it’s apparent when looking at our very first Stranger shot and comparing it to the most recent shot above. Doing the Stranger Project is simply a way of forcing me to reach out to people and asking them if I can take their picture. That’s the big step. The next step of asking them if they would like to set up a more formal shoot is a tiny step.
Especially if you create something that they like.
The Hat, or rather, this hat isn’t really a hat. It’s a prop. A prop to be used in various photos.
Last summer my wife and I were perusing the Central California coast taking in some sun, surf and the occasional winery for some tasting. We stopped at a gas n go in Cambria and I cam across this hat among all the other stuff you find in such places. We both looked at the hat and simultaneously expressed how we absolutely needed to buy it. Not to actually wear, mind you. But as a photo prop. So I coughed up the $10.99 for the hat and away we went. As you can see, The Hat is truly awesome in the kitschy way that is unique to road side gas n go’s throughout various slices of Americana.
ISO 100, 50mm, f9.0, 1/200
The photo above was done using a Yongnuo YN560-III Speedlite with an ExpoImaging Rogue 3-in-1 Flash Grid camera right. Yeah, yeah it’s a hat; The Hat, but I really dig this hat. I like the photo too. The Rogue Grid is one of those modifiers that aren’t really very versatile, but it’s way cool when you want that look; that hard light, heavy contrast look.
Anyway, after we bought The Hat we continued south with the hopes of finding some seaside location in which to shoot some pics with our newly acquired prop. We finally found a place just north of Cayucos. It required a short hike through a grassy area down to a small rocky beach. I took one of the Yongnuos and a stand with me. The mid-day, bright harsh sun–which a lot of photographers hate–was perfect for what I had in mind. Trust me, don’t be afraid of harsh mid-day sun.
As it turned out I couldn’t use my stand because of how windy it was, plus our location had some serious surf rolling in. So I had my son hold the light. I also used a 3 stop ND filter. Even then I still closed down the lens to f10 in order to push the background down to what I was wanting to do. My wife, being the trouper she is held on to The Hat and stood in the water and dealt with the stiff wind. Did I mention that the wind was pretty cold?
Yeah, there’s that.
We fired off a bunch of different shots; enough to where I had to let the little Yongnuo cool down for a bit. At first I was trying to get some full body shots, but the bare speedlight just wasn’t the right tool for that job, so I opted to get in close and use the light to fill in the shadows under the hat yet still retain the heavily contrasty hard light.
This is my favorite shot of the bunch:
ISO 100, 50mm, f10, 1/200
This shot is almost exactly what I was trying for.
Of course I also took some shots without the hat during the same session. With this one I took some post processing funkiness liberties:
ISO 100, 50mm, f10, 1/200
I was trying to catch a shot with some flying birds in the background and had my son running around with the light while I was positioning myself. If I remember correctly my wife wasn’t really in take a photo mode. She was just hanging out. The lighting is definitely wacky, but I like it OK. More importantly, I got my flying birds.
We’ve since employed The Hat in other shoots. This shot is in Idaho at a place called Crystal Mountain just outside of McCall. It’s much along the lines of the seaside hat pic above. This, too, was using the little speedlight camera right, but through a shoot through umbrella:
ISO 100, 50mm, f2.5, 1/200
This one was shot with the D750 and I used a 3 stop ND filter so that I could open up to f2.5 for background separation. I particularly like this shot.
After this pic we headed down the mountain and ended up on the Salmon River. This one I did not use the ND filter. The canyon was socked in with smoke cutting a lot of the sun out. I did use the speedlight, though. Again it was shot through a white umbrella:
ISO 100, 50mm, f4.0, 1/200
I think that The Hat works great here with the rustic nature of the surroundings.
This last pic is another hard light pic, shooting into a sunset. You guessed it, I used the speedlight again, but this time it was bare thus the hard light and contrasts:
ISO 100, 50mm, f3.2, 1/100
I really like this shot. A lot of people wouldn’t, but I do this for myself. It looks like a country singer’s album. I will say that in hindsight I think that using a shoot through umbrella would have been better.
Side note, this pic was taken near the Snake River and it was a muggy buggy bastard. Mosquitos were so thick that I thought we would be carried away by the hungry little monsters. Trying to catch a shot between swatting them was a challenge.
Anyway, from the Central California coast to the Idaho wilderness to my basement studio, The Hat served me well last summer. This upcoming summer we have some more road trips on the docket and I have big plans for The Hat.